
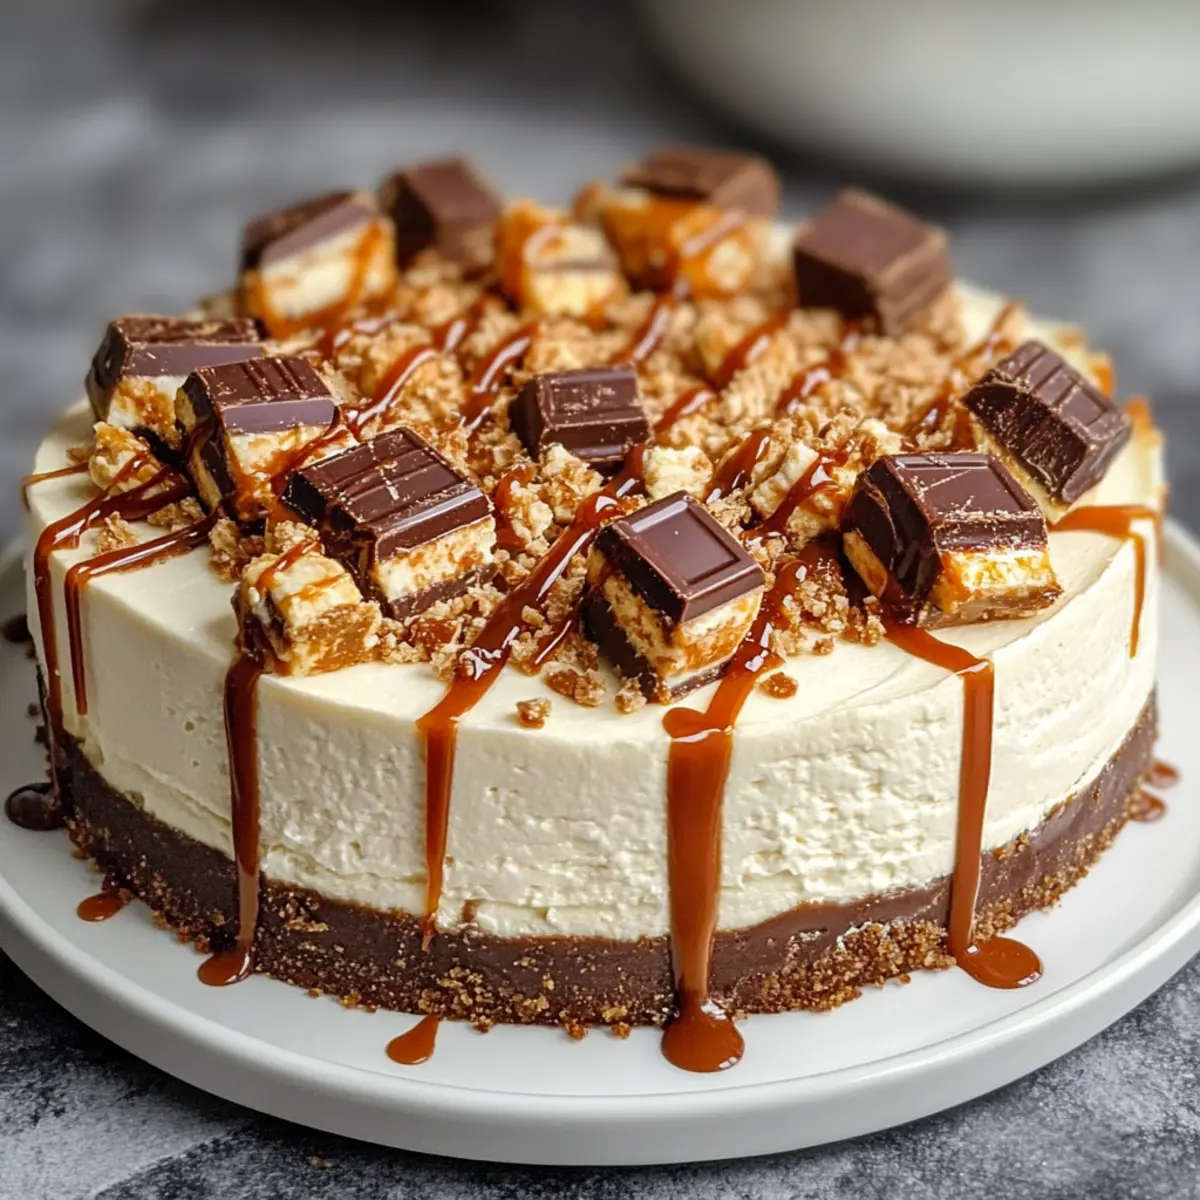
As I poured the caramel sauce over the chilled cheesecake, a wave of nostalgia washed over me, transporting me back to carefree afternoons spent devouring Twix bars. This Homemade No Bake Twix Cheesecake captures that beloved flavor in a decadent dessert, combining creamy filling with a crunchy chocolate crust—all without turning on the oven! In just about 30 minutes of prep, you can whip up this indulgent treat, perfect for impressing guests or treating yourself after a long day. Plus, it’s customizable, so whether you’re craving a touch of sea salt or a sprinkle of nuts on top, the options are endless. Are you ready to elevate your dessert game and satisfy that sweet tooth? Let’s dive in!
Why is This Cheesecake a Must-Try?
No-Bake Convenience: Say goodbye to the oven! This recipe saves you precious time while delivering incredible flavor, making it perfect for any weeknight.
Irresistible Flavor: The rich combination of caramel and chocolate will transport your taste buds straight to candy heaven.
Customizable Toppings: Get creative! Add your favorite candies, nuts, or even a drizzle of sea salt for that perfect balance of sweet and salty.
Crowd-Pleaser: Whether at a family gathering or casual get-together, this cheesecake is guaranteed to impress and satisfy everyone’s sweet cravings.
Quick Preparation: In just about 30 minutes, you can have this luscious dessert chilling in your fridge, ready for whenever the sweet tooth strikes.
Easy Storage: Make it in advance and enjoy it for days! This cheesecake keeps well in the fridge, making it a stress-free dessert option.
Dive into other delectable desserts like Apple Cinnamon Bake or try out the delightful Bake Gingerbread Cheesecake for more sweet inspirations!
Homemade No Bake Twix Cheesecake Ingredients
For the Cheesecake Filling
• Cream Cheese – provides the creamy base for this delicious No Bake Twix Cheesecake; use vegan cream cheese for a dairy-free option.
• Sweetened Condensed Milk – adds a rich sweetness and smooth texture; consider unsweetened alternatives if you prefer less sugar.
For the Crust
• Chocolate Graham Crackers – forms the flavorful crust; swap for gluten-free graham crackers to make this treat gluten-free.
• Butter – binds the crust and enhances richness; coconut oil can be used for a dairy-free version.
For the Toppings
• Chocolate Chips – sprinkled on top to amplify the chocolate goodness; opt for dark or dairy-free chocolate as an alternative.
• Caramel Sauce – drizzled for added sweetness and a decadent finish; feel free to use store-bought or homemade.
Each of these components plays a vital role in creating a luscious dessert that will leave your taste buds dancing!
Step‑by‑Step Instructions for Homemade No Bake Twix Cheesecake
Step 1: Prepare the Crust
Begin by crushing 1 ½ cups of chocolate graham crackers into fine crumbs using a food processor or a zip-top bag and rolling pin. Next, melt ½ cup of butter and mix it with the crumbs in a bowl until fully combined. Press the mixture firmly into the bottom of a 9-inch springform pan, forming an even layer. Aim for a compact crust that holds together well.
Step 2: Mix the Filling
In a large mixing bowl, add 16 ounces of softened cream cheese. Beat with an electric mixer on medium speed until smooth and creamy, about 2-3 minutes. Gradually pour in 1 can (14 ounces) of sweetened condensed milk, continuing to mix until fully incorporated and the mixture is silky. The goal is a smooth, lump-free filling that will serve as the base for your Homemade No Bake Twix Cheesecake.
Step 3: Incorporate the Candies
Roughly chop 4-6 fun-sized Twix bars into small pieces, then gently fold them into the cream cheese mixture until evenly distributed. This adds a delightful crunch and flavor reminiscent of the beloved candy bar. Pour the creamy filling over the prepared graham cracker crust in the springform pan, smoothing the top with a spatula to create a beautiful finish.
Step 4: Chill the Cheesecake
Cover the springform pan tightly with plastic wrap, and refrigerate the cheesecake for at least 4 hours, or until set. This step is crucial for achieving the perfect texture, as the filling will firm up during chilling. You can prepare the cheesecake in advance to allow for more setting time, ensuring the flavors meld beautifully.
Step 5: Add the Final Touches
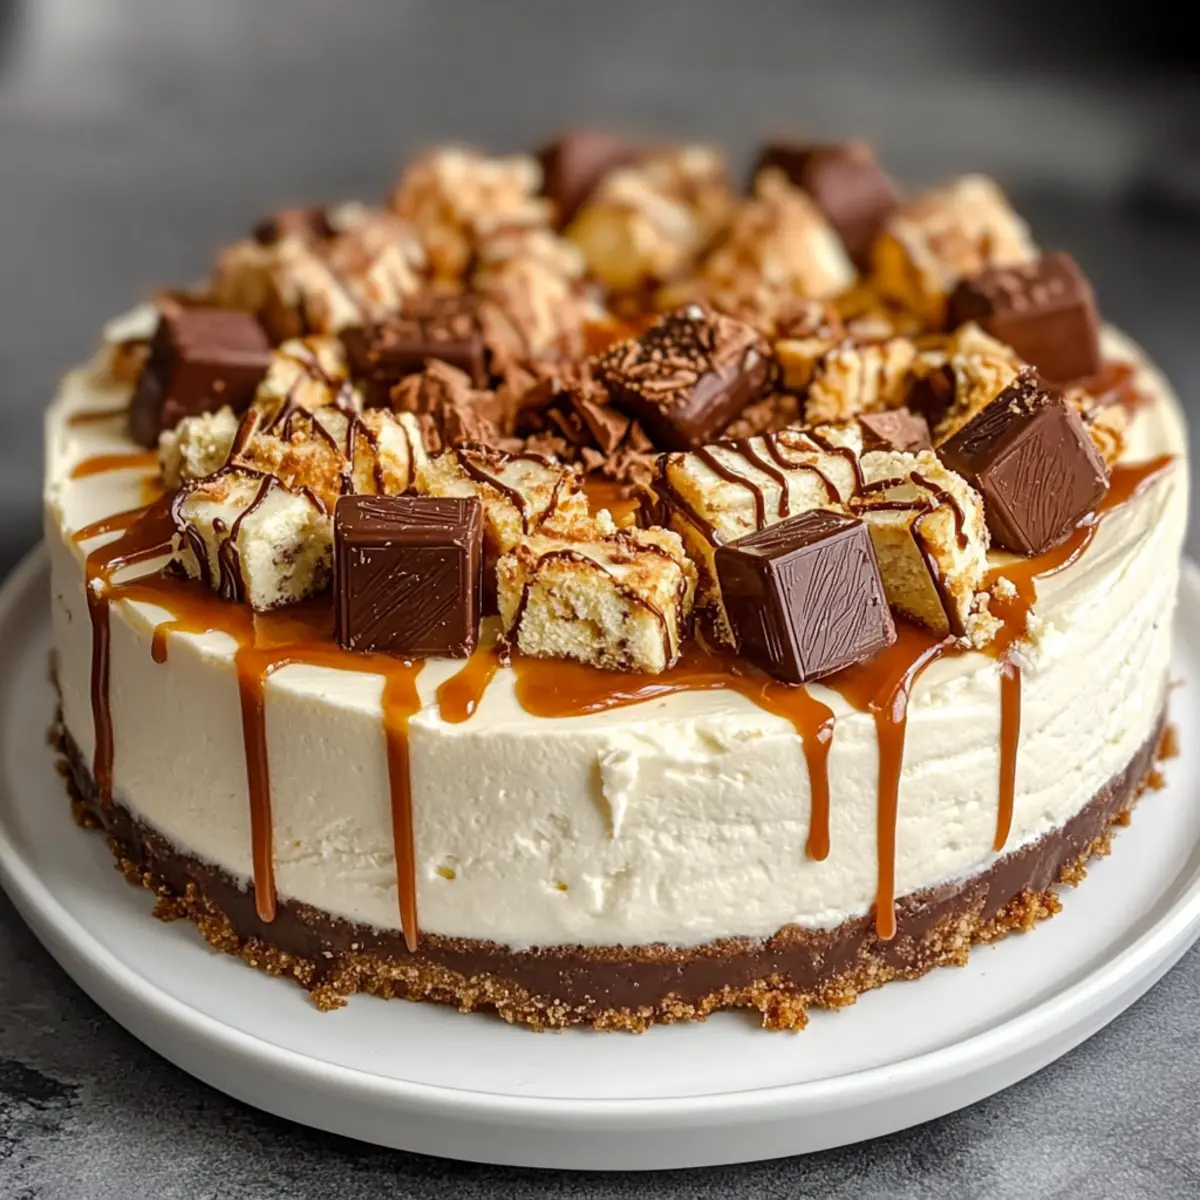
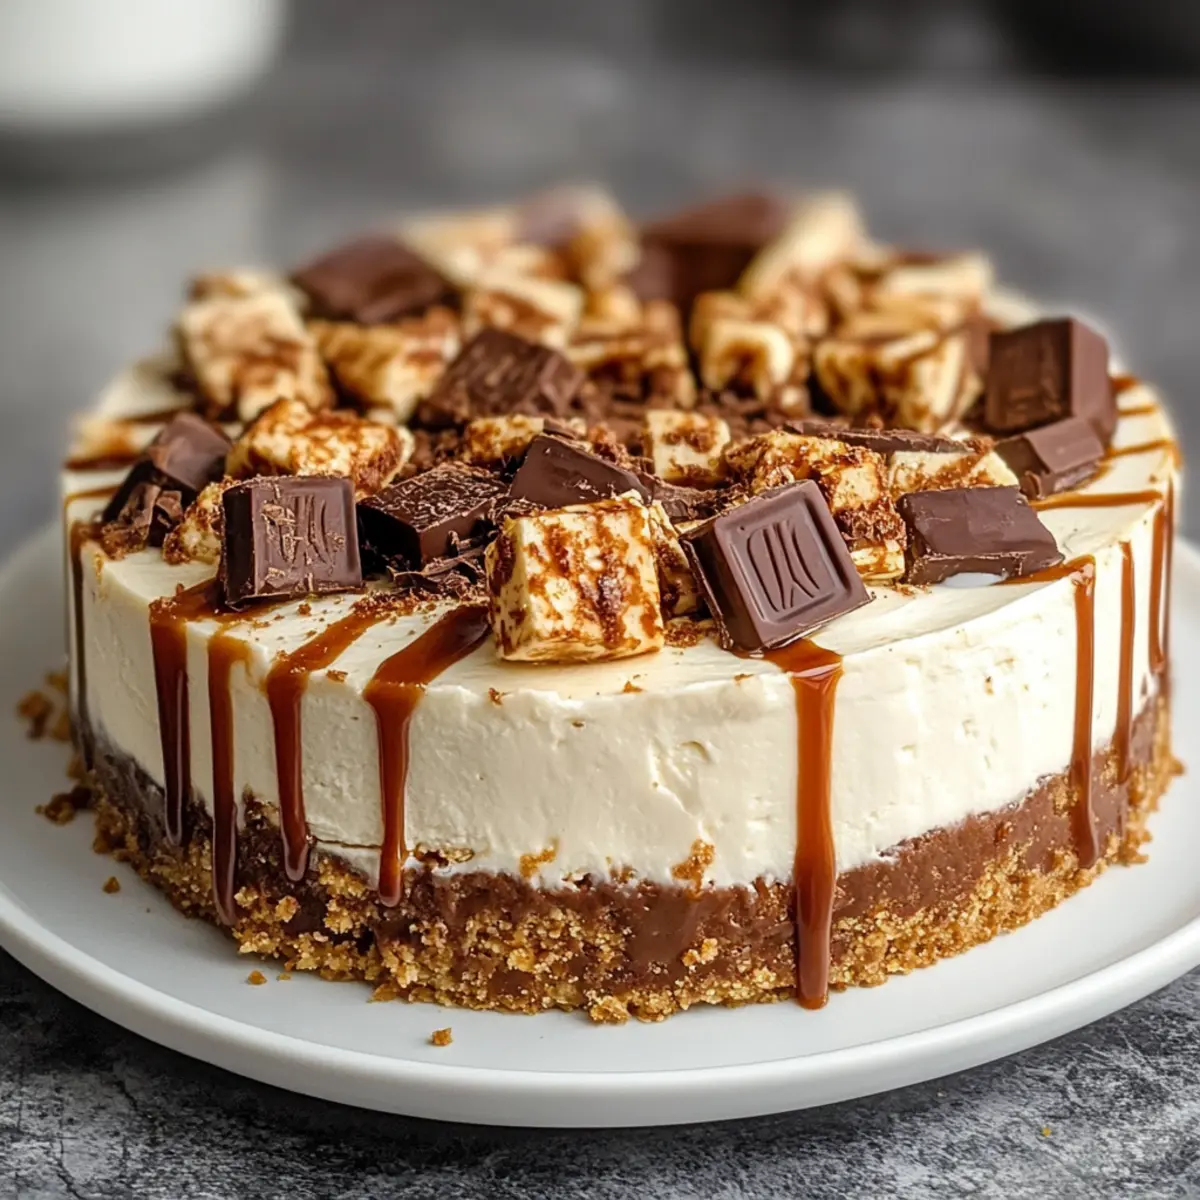
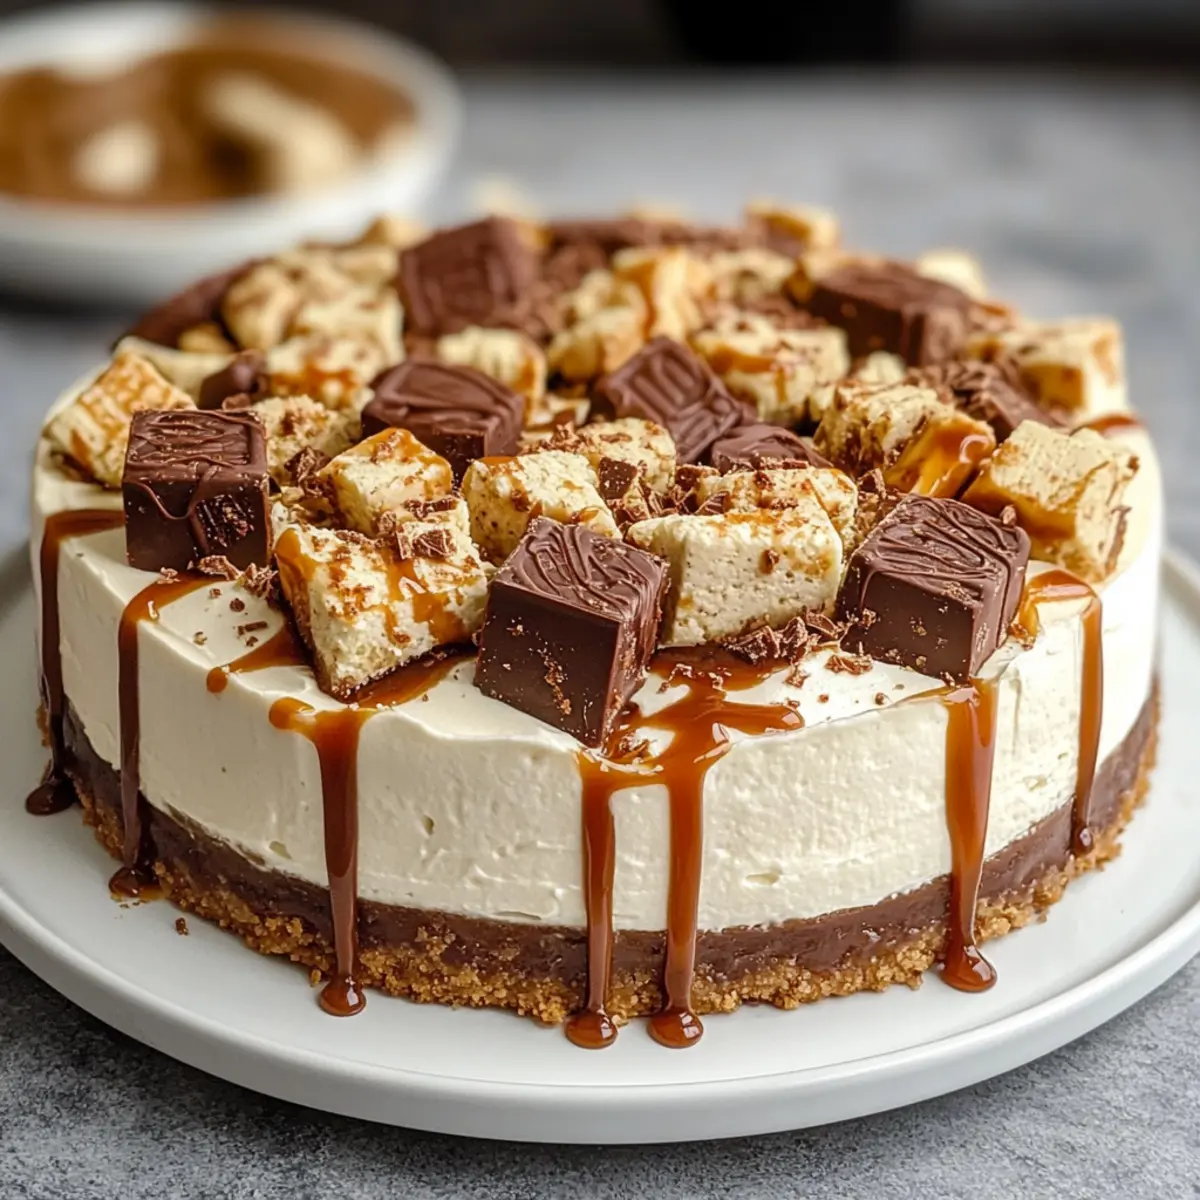
Once the cheesecake is set, remove it from the refrigerator and carefully drizzle chocolate ganache and caramel sauce over the top for an indulgent finish. For the ganache, melt ½ cup of chocolate chips with 2 tablespoons of heavy cream in the microwave, stirring until smooth. Optionally, sprinkle additional chopped Twix pieces on top for added flair and texture before slicing.
Step 6: Serve and Enjoy
Carefully release the sides of the springform pan and slice the Homemade No Bake Twix Cheesecake into wedges. Serve chilled, garnished with fresh berries or whipped cream if desired. Each slice reveals the layers of creamy filling and crunchy crust that are sure to impress your family and friends at any gathering.
What to Serve with Homemade No Bake Twix Cheesecake
Elevate your dessert experience by pairing this creamy, indulgent cheesecake with delightful sides that complement its flavor and texture.
-
Whipped Cream:
Topping your cheesecake with fluffy whipped cream adds a light, airy contrast to the rich dessert. A dollop on each slice enhances the overall indulgence. -
Fresh Berries:
Fresh raspberries or strawberries provide a refreshing burst of tartness and vibrant color. Their acidity balances the sweetness of the cheesecake beautifully. -
Chocolate Sauce:
A drizzle of warm chocolate sauce intensifies the dessert’s flavors and adds an extra layer of richness. Perfect for chocolate lovers craving that extra hit of decadence. -
Caramel Drizzle:
Amplify the caramel notes by drizzling additional caramel sauce over your slices. It beautifully enhances the dessert’s sweet, buttery tones. -
Crushed Nuts:
Sprinkle chopped pecans or walnuts for a crunchy texture and nutty flavor. It adds a delightful contrast to the smooth creaminess of the cheesecake. -
Coffee or Espresso:
Serving your cheesecake with a cup of coffee or a shot of espresso creates a delicious pairing that contrasts beautifully with the sweetness and creaminess. -
Mint Leaves:
Garnishing slices with fresh mint leaves adds a pop of color and a refreshing herbal note. They brighten up the dessert, making it visually appealing and refreshing.
Homemade No Bake Twix Cheesecake Variations
Feel free to play with this recipe and tailor it to your taste! The possibilities are as scrumptious as they are creative.
-
Nutty Crust: Substitute crushed almonds or walnuts for a crunchy twist in the crust, adding a delightful nuttiness that pairs beautifully with the cheesecake.
-
Dairy-Free Delight: Use vegan cream cheese and dairy-free chocolate chips for a completely plant-based version, allowing everyone to indulge without the dairy.
-
Flavor Infusion: Try adding a splash of vanilla extract or a hint of almond extract to the filling for a subtle flavor enhancement that complements the chocolate beautifully.
-
Caramel Swirl: Before chilling, swirl in some extra caramel sauce right into the filling for delightful ribbons of sweetness that will take it to the next level.
-
Fruit Fusion: Top the cheesecake with fresh strawberries or raspberries before serving, adding a burst of color and fresh acidity that balances the richness of the dessert.
-
Cookie Crust Variation: Replace chocolate graham crackers with Oreo cookies for a bold, chocolaty base that offers a different flavor profile while staying deliciously decadent.
-
Peanut Butter Twist: Mix in peanut butter with the cream cheese for a luscious peanut butter version that beautifully complements the chocolate and caramel.
-
Heat it Up: For those who enjoy a kick, sprinkle in a pinch of cayenne pepper to the chocolate ganache for a surprising yet delightful spicy contrast against the sweet flavors.
Explore delicious variations that fit your mood and occasion! You might also want to try out other decadent treats like the comforting Apple Cinnamon Bake or the festive Bake Gingerbread Cheesecake for more delightful dessert ideas!
Make Ahead Options
These Homemade No Bake Twix Cheesecake are perfect for busy home cooks looking to streamline their dessert preparation! You can prepare the crust and filling up to 24 hours in advance. Simply crush the chocolate graham crackers and mix them with melted butter to create the crust; press it into the pan and store it tightly covered in the fridge. For the filling, follow your mixing instructions and refrigerate it separately until you’re ready to assemble. Just before serving, pour the filling over the crust and refrigerate again for at least 4 hours, ensuring it sets beautifully. This make-ahead approach not only saves time but keeps your cheesecake just as delicious! Enjoy a stress-free dessert experience!
Expert Tips for Homemade No Bake Twix Cheesecake
-
Room Temperature Cream Cheese: Make sure your cream cheese is at room temperature to achieve a silky smooth filling; cold cream cheese can create lumps.
-
Set Time Matters: If you prefer a firmer texture, let your cheesecake chill longer than 4 hours, preferably overnight for best results.
-
Use Piping Bags: For a beautifully drizzled ganache and caramel, use a piping bag to control the flow and create stunning designs.
-
Chocolate Substitutes: If you’re using different toppings, adjust your sweetened condensed milk accordingly to maintain the perfect balance of sweetness in your Homemade No Bake Twix Cheesecake.
-
Testing the Crust: Gently press the crust with the back of a measuring cup to ensure it’s tightly packed, preventing it from crumbling when sliced.
How to Store and Freeze Homemade No Bake Twix Cheesecake
Fridge: Store the cheesecake in an airtight container or cover it tightly with plastic wrap. It will keep well in the refrigerator for up to 5 days.
Freezer: For longer storage, slice the cheesecake and wrap each piece individually in plastic wrap, then place them in a freezer-safe container. It can be frozen for up to 3 months.
Thawing: When ready to enjoy, transfer the cheesecake slices to the fridge and allow them to thaw overnight. For quicker serve, leave at room temperature for about 30 minutes.
Reheating: There’s no need to reheat this no bake cheesecake; simply serve it chilled straight from the fridge or after thawing from the freezer!
Homemade No Bake Twix Cheesecake Recipe FAQs
How do I select ripe cream cheese for the filling?
Absolutely! When choosing cream cheese, look for packages that are not damaged and have a good expiration date. I recommend letting it sit out for about 30 minutes to reach room temperature for the best blending results. A smooth texture is key for your Homemade No Bake Twix Cheesecake!
How should I store leftovers?
Make sure to store the cheesecake in an airtight container or wrap it tightly with plastic wrap to prevent drying out. It can stay fresh in the refrigerator for up to 5 days. I often make it a day in advance, so it’s ready for gatherings the next day!
Can I freeze the Homemade No Bake Twix Cheesecake?
Yes, you can! To freeze, slice the cheesecake first and wrap each slice in plastic wrap. Place the wrapped slices in a freezer-safe container for extra protection. It can be frozen for up to 3 months. When you’re ready to enjoy a slice, simply transfer it to the fridge and let it thaw overnight.
What if my cheesecake is too soft after chilling?
Very good question! If your cheesecake doesn’t set as firm as you’d like, it could be due to insufficient chilling time or not enough cream cheese. To troubleshoot, allow for an extra hour or two of chilling. For firmer results in the future, consider letting it chill overnight or using a higher cream cheese ratio.
Are there any dietary considerations I should keep in mind?
Definitely! If you or your guests have dietary restrictions, you can make this cheesecake gluten-free by using gluten-free graham crackers. For a dairy-free version, substitute cream cheese with a vegan alternative and use coconut oil instead of butter. Always check labels for potential allergens when purchasing ingredients, especially for the chocolate chips and caramel sauce.
Homemade No Bake Twix Cheesecake You'll Crave Again and Again
Ingredients
Equipment
Method
- Begin by crushing 1 ½ cups of chocolate graham crackers into fine crumbs using a food processor or a zip-top bag and rolling pin. Next, melt ½ cup of butter and mix it with the crumbs until fully combined. Press the mixture firmly into the bottom of a 9-inch springform pan.
- In a large mixing bowl, add 16 ounces of softened cream cheese. Beat with an electric mixer on medium speed until smooth and creamy, about 2-3 minutes. Gradually pour in 1 can (14 ounces) of sweetened condensed milk, mixing until fully incorporated.
- Roughly chop 4-6 fun-sized Twix bars into small pieces and gently fold them into the cream cheese mixture until evenly distributed. Pour the creamy filling over the prepared crust in the springform pan.
- Cover the pan tightly with plastic wrap and refrigerate for at least 4 hours until set.
- Once set, drizzle chocolate ganache and caramel sauce over the top. For ganache, melt ½ cup of chocolate chips with 2 tablespoons of heavy cream in the microwave until smooth.
- Carefully release the sides of the springform pan and slice the cheesecake into wedges. Serve chilled, optionally garnished with fresh berries or whipped cream.
Leave a Reply