
As I stood in my kitchen, the aroma of simmering cashews danced through the air, reminding me of the countless culinary experiments that often end in surprise triumphs. Today, I’m excited to share my recipe for Homemade Vegan Halloumi Cheese—a delightful and chewy dairy-free alternative that’s surprisingly easy to whip up. Packed with tangy, salty goodness, this vegan cheese is perfect for enhancing salads, sandwiches, or even a hearty pasta dish. Not only does this recipe cater to a plant-based lifestyle, but it also saves time and effort compared to store-bought options, ensuring you’re never at the mercy of fast food cravings. Ready to bring some homemade magic to your table? Let’s dive into the world of creamy, cashew-based deliciousness!
What Makes This Halloumi So Special?
Uniqueness: This Homemade Vegan Halloumi is a game changer, capturing the chewy, salty essence of traditional halloumi without any dairy.
Surprisingly Easy: You’ll find the easy-to-follow steps make the process simple, even for beginners!
Versatile: Perfect in salads, sandwiches, or grilled, the culinary possibilities are endless.
Healthier Choice: Crafted from nutritious ingredients, it’s a guilt-free indulgence that shines above fast food.
Crowd-Pleaser: Your family and friends will adore this tasty alternative, proving that plant-based cooking can be exciting.
For a fun dessert pairing, you might also enjoy these Dark Chocolate Quinoa Crisps!
Homemade Vegan Halloumi Ingredients
For the Cheese Base
• Raw Cashews – essential for creaminess; make sure to soak them well for smooth blending.
• Dijon Mustard – adds a tangy flavor; there’s no direct substitute for that distinct taste.
• Lemon Juice – brightens the flavor profile; you can use lime juice as a suitable alternative.
• Sea Salt – enhances all the flavors; adjust according to your taste preference.
• Light Olive Oil – contributes richness; feel free to swap it with another neutral oil if needed.
• White Wine Vinegar – adds acidity; apple cider vinegar can work as a good substitute.
• Nutritional Yeast – gives that cheesy taste; though it’s best not to skip this, omit if unavailable.
• Cold Water – helps with blending; no substitutes are needed here.
• Agar Agar – critical for texture; must be used for the right consistency, preferably in powder form.
• Cornstarch (Cornflour) – thickens the mixture; you can use arrowroot powder instead, at about double the amount.
This delightful Homemade Vegan Halloumi is not just delicious but also incredibly easy to make!
Step‑by‑Step Instructions for Homemade Vegan Halloumi
Step 1: Soak and Boil Cashews
In a medium pan, bring water to a boil and add raw cashews. Let them simmer for 15 minutes until they’re soft and plump. This soaking process will help create that creamy texture in your Homemade Vegan Halloumi. Once done, carefully drain the cashews to remove any excess liquid, ensuring a smooth final product.
Step 2: Blend Ingredients
Transfer the drained cashews to a blender or food processor. Add Dijon mustard, lemon juice, sea salt, olive oil, white wine vinegar, nutritional yeast, cold water, agar agar, and cornstarch. Blend on high for 2-3 minutes until the mixture is completely smooth, without any lumps. This creamy base is crucial for achieving the perfect texture in your vegan halloumi.
Step 3: Cook the Mixture
Pour the smooth mixture into a nonstick pan and heat it over medium heat. Stir continuously for about 5-10 minutes until the mixture thickens and starts to pull away from the sides of the pan. This step is important, as it activates the agar agar, giving your Homemade Vegan Halloumi its desirable chewy texture.
Step 4: Chill and Set
Once the mixture has thickened, transfer it to a shallow dish, spreading it evenly. Allow it to cool slightly at room temperature before covering with plastic wrap. Place the dish in the refrigerator and let it set for at least 3 hours, or until firm. This chilling time will help the flavors meld and the texture to solidify beautifully.
Step 5: Slice the Halloumi
After the chilling period, remove your Homemade Vegan Halloumi from the refrigerator. Carefully slice it into 6 equal pieces using a sharp knife. This step is essential for ensuring even frying and a perfect presentation when serving your vegan cheese on salads or in sandwiches.
Step 6: Fry the Halloumi Slices
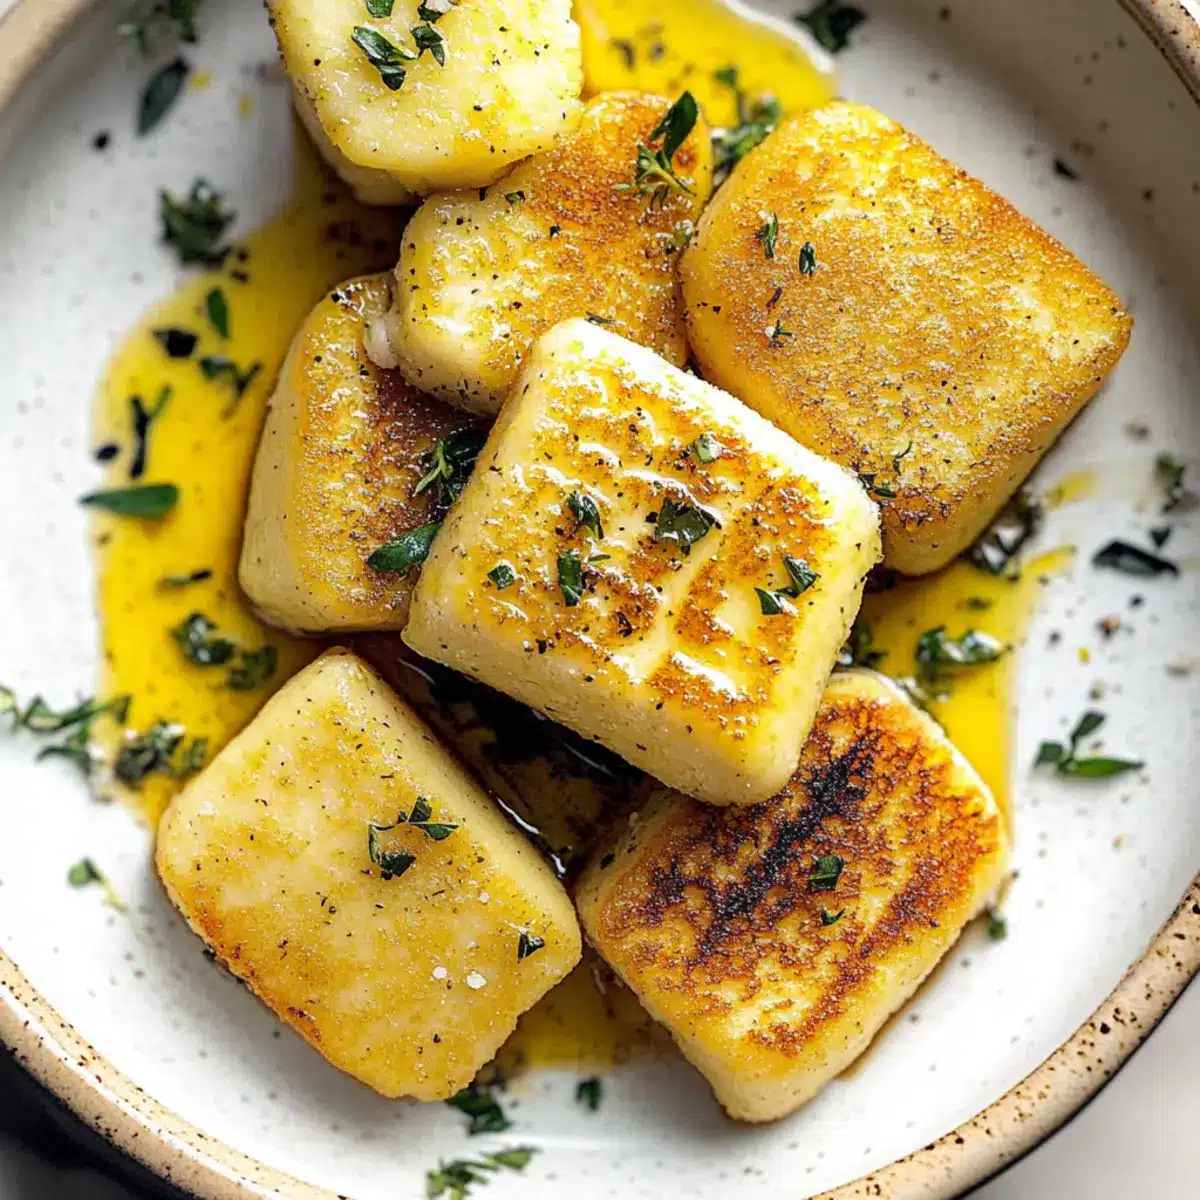
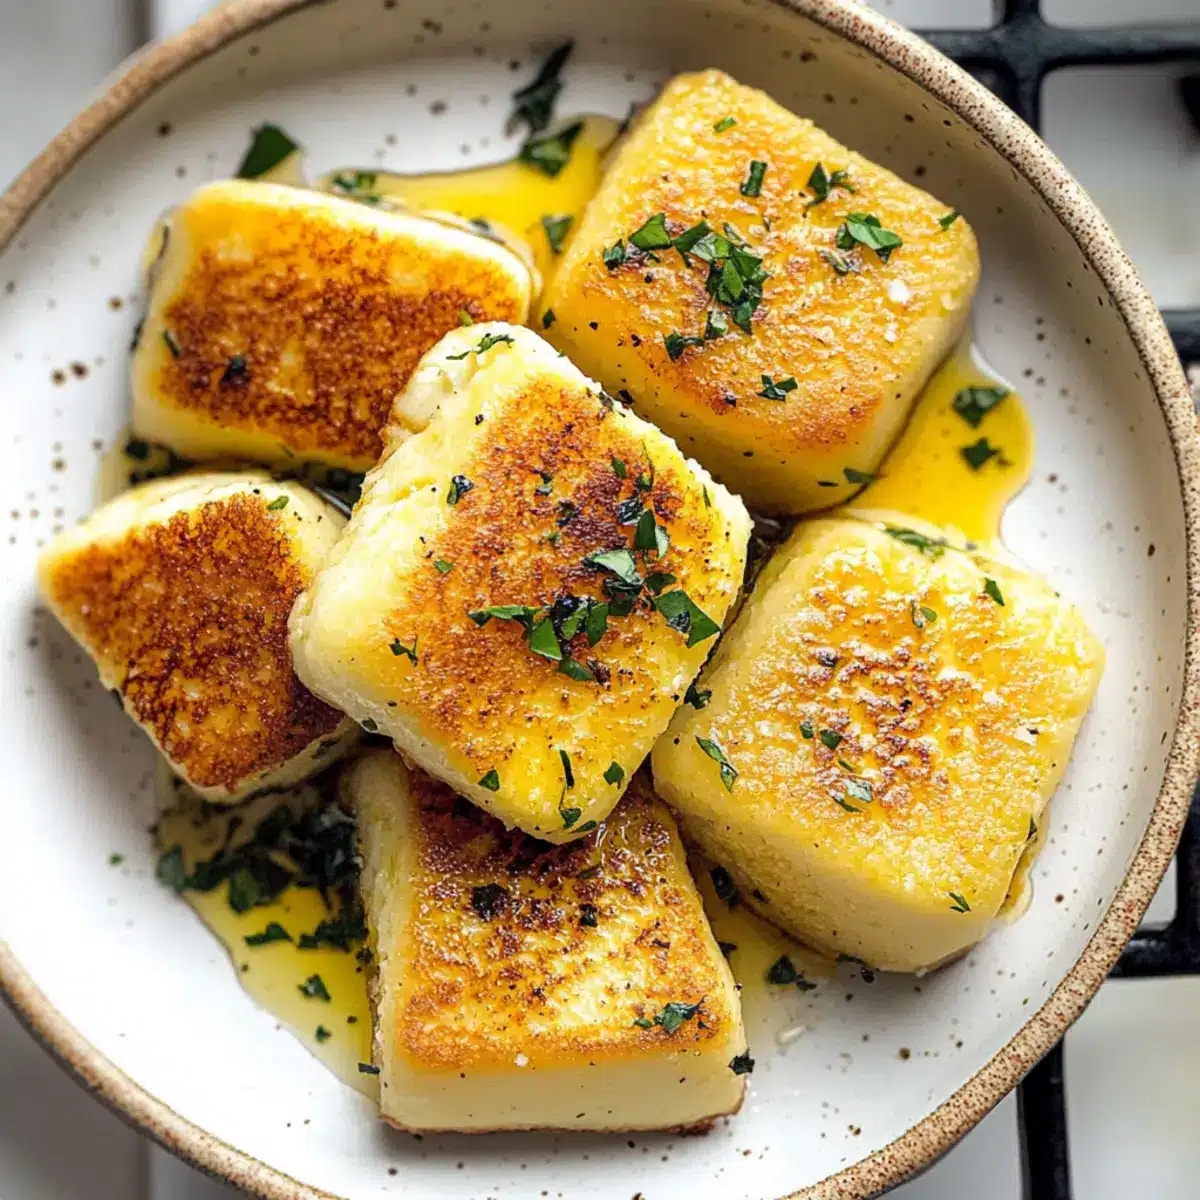
Heat a lightly oiled nonstick pan over medium heat. Once hot, add the sliced halloumi and fry for about 5 minutes on each side until they are golden brown and crispy. The gorgeous golden crust adds an appealing texture, enhancing the overall taste of your delicious homemade vegan cheese.
Step 7: Serve and Enjoy
Once crispy, remove the cooked slices from the pan and place them on a paper towel to absorb excess oil. Serve your Homemade Vegan Halloumi warm, either on salads, in sandwiches, or as a delightful addition to a hearty pasta dish. The tangy and chewy flavors will surely impress anyone who tries it!

Homemade Vegan Halloumi Variations
Feel free to get creative with your homemade vegan halloumi! Here’s how to make it your own.
-
Nut-Free: Use silken tofu as a base instead of cashews for a different creamy texture. Just blend until smooth!
-
Flavor Boost: Add garlic powder or smoked paprika to the mixture for an extra pop of flavor. These spices blend beautifully and elevate your halloumi.
-
Spicy Twist: Incorporate a dash of cayenne pepper or crushed red pepper flakes for a zesty kick. It’s a delightful way to add some heat to your dish!
-
Herby Delight: Fold in fresh herbs like chopped basil or thyme before you chill the mixture. This will infuse each slice with fresh, aromatic flavors.
-
Citrus Zing: Swap out lemon juice for orange juice for a sweet and tangy twist. It gives a wonderful brightness that complements your halloumi beautifully.
-
Miso Magic: Add a tablespoon of white miso paste for a savory umami depth. It’s a fantastic way to enrich the flavor without overpowering the cheese.
-
Dairy Brick Substitute: If you crave a firmer texture, pour the mixture into a larger container and freeze it before slicing. Then, grate it for use in salads or pasta!
-
Herbed Nutritional Yeast: Try a flavored nutritional yeast variety (like garlic or herb) for a cheesy boost with a unique twist. You might find it works wonders in your next vegan pasta dish or sprinkled on roasted veggies.
For a delightful dessert to enjoy afterward, check out these Dark Chocolate Quinoa Crisps that perfectly complement your meal!
Make Ahead Options
These Homemade Vegan Halloumi slices are perfect for meal prep, allowing you to enjoy a delicious, hearty dish even on your busiest days! You can prepare the cheese mixture up to 24 hours in advance by following the initial steps: soak and boil the cashews, blend the ingredients, and cook the mixture. Once cooked, cover and refrigerate it to set, allowing the flavors to meld beautifully. Before serving, slice the halloumi and simply fry it for about 5 minutes on each side until golden and crispy. This not only saves time but ensures that your vegan cheese is just as delicious when you’re ready to enjoy it.
Storage Tips for Homemade Vegan Halloumi
Fridge: Store any leftovers in an airtight container in the refrigerator for up to 4 days to maintain freshness and texture.
Freezer: Not recommended for freezing, as the texture may change significantly once thawed, affecting your Homemade Vegan Halloumi experience.
Reheating: For best results, reheat slices in a lightly oiled pan over medium heat for about 2-3 minutes on each side until heated through and slightly crispy again.
Preparation: You can make this vegan cheese ahead of time; it holds up well in the fridge and is perfect for meal prepping!
What to Serve with Homemade Vegan Halloumi
Elevate your dining experience with enticing pairings that bring out the best in this flavorful cheese alternative.
- Fresh Greek Salad: The cool, crisp vegetables and tangy feta-like flavors complement the rich creaminess of the halloumi beautifully.
- Herbed Quinoa: Fluffy, fragrant quinoa with fresh herbs adds a lovely texture and balances the tanginess of the cheese.
- Grilled Vegetables: Charred, smoky veggies provide a delightful contrast to the chewy halloumi, creating a perfect summer dish.
- Creamy Avocado Toast: The buttery texture of ripe avocado pairs wonderfully with the salty halloumi, elevating any breakfast or brunch.
- Spicy Roasted Chickpeas: Crunchy and spicy, these provide a satisfying crunch alongside the soft, chewy cheese for a fun contrast.
- Mint Yogurt Sauce: A cooling, refreshing sauce balances the strong flavors of the halloumi, creating an incredible flavor harmony.
- Zesty Lemon Rice: Bright, lemony rice adds a refreshing zest that complements the savory notes of your vegan halloumi.
- Red Wine Spritzer: This light and refreshing drink pairs perfectly, enhancing your meal without overpowering the halloumi’s delicate flavors.
- Dark Chocolate Mousse: For dessert, a rich mousse offers a luxurious finish, balancing the savory with a touch of sweetness.
Expert Tips for Homemade Vegan Halloumi
• Agar Agar Essential: Do not skip the agar agar; it’s crucial for achieving the right texture. Using less will compromise the chewiness.
• Drain Well: Ensure your cashews are thoroughly drained after boiling. Excess liquid can lead to a runny mixture, ruining your Homemade Vegan Halloumi.
• Consistent Whisking: When heating the mixture, stir continuously to prevent lumps. This patience ensures a smooth, creamy final product.
• Season to Taste: Always taste the mixture before cooking. Adjust salt and acidity to your liking for the best flavor in your Homemade Vegan Halloumi.
• Proper Cooling Time: Allow a full 3 hours in the fridge for setting. Rushing this step might result in a softer texture that doesn’t slice well.

Homemade Vegan Halloumi Cheese Recipe FAQs
How do I choose the best cashews for this recipe?
Absolutely! When selecting raw cashews, look for ones that are plump and creamy in color. Avoid any with dark spots or an off smell, as these could indicate spoilage. Fresh, high-quality cashews are essential for achieving that creamy, delightful texture in your Homemade Vegan Halloumi.
What is the best way to store leftover vegan halloumi?
Store any leftovers in an airtight container in the refrigerator for up to 4 days. Make sure to keep it tightly sealed, as exposure to air can alter its texture and flavor. Placing parchment paper between slices can help prevent sticking!
Can I freeze homemade vegan halloumi?
It’s not recommended to freeze this cheese as the texture may become mushy when thawed. However, if you need to, slice it first, then wrap each piece tightly in plastic wrap and place them in a freezer bag. For best results, consume within 3 months and reheat directly in a pan to restore some crispiness.
What if my halloumi doesn’t set properly?
If your Homemade Vegan Halloumi doesn’t set, there could be a few reasons. Ensure your agar agar was fresh and used in the correct proportions. If it remains soft, try heating it again in the pan, stirring continuously until it thickens further. If you’re in a pinch, you can double the agar agar and reheat while mixing if the result is slightly runny.
Is this recipe suitable for those with nut allergies?
Unfortunately, this recipe is primarily based on cashews, so it’s not suitable for anyone with nut allergies. If you’re looking for alternatives, you could experiment with tofu, but the flavor and texture will differ. Always check individual ingredient labels if allergies are a concern.
Can I adjust the flavors in this vegan halloumi?
Absolutely! The beauty of this recipe lies in its versatility. You can add more lemon juice for brightness or extra nutritional yeast for a cheesier flavor. Adjust the salt to your preference, and feel free to incorporate herbs or spices to create your unique twist on Homemade Vegan Halloumi!
Homemade Vegan Halloumi That Will Wow Your Taste Buds
Ingredients
Equipment
Method
- Soak cashews in boiling water for 15 minutes and drain.
- Blend soaked cashews with Dijon mustard, lemon juice, sea salt, olive oil, white wine vinegar, nutritional yeast, cold water, agar agar, and cornstarch until smooth.
- Heat the blended mixture in a nonstick pan over medium heat, stirring continuously for 5-10 minutes until thickened.
- Transfer to a shallow dish, let cool slightly at room temperature, cover, and refrigerate for at least 3 hours.
- Slice the chilled halloumi into 6 equal pieces.
- Fry the slices in a lightly oiled pan over medium heat for about 5 minutes on each side until golden brown.
- Serve warm on salads, in sandwiches, or with pasta.
Leave a Reply