
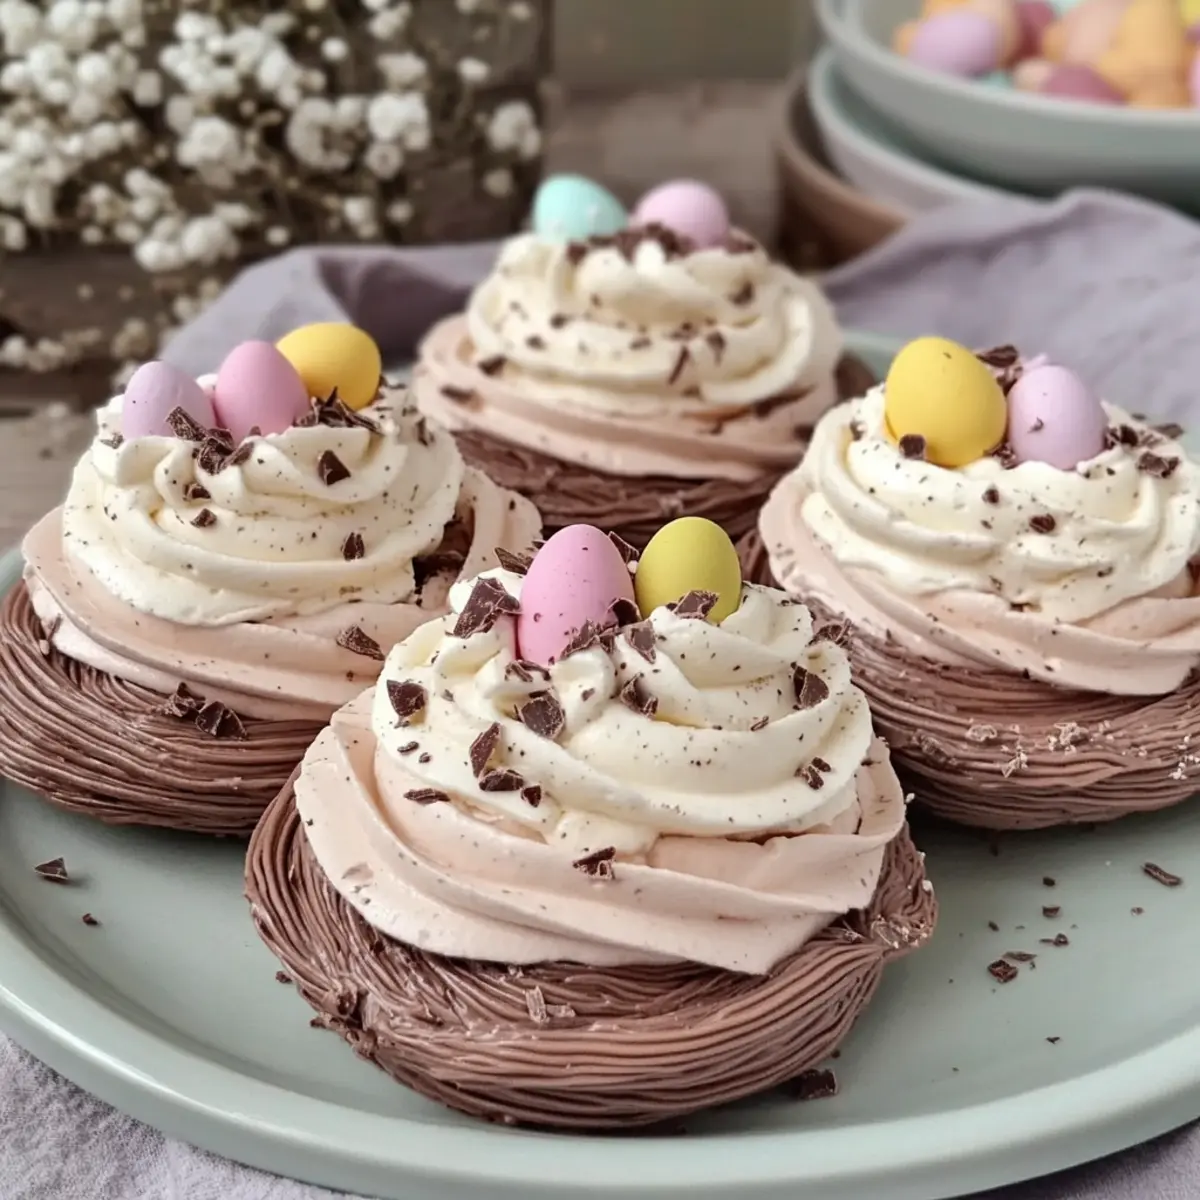
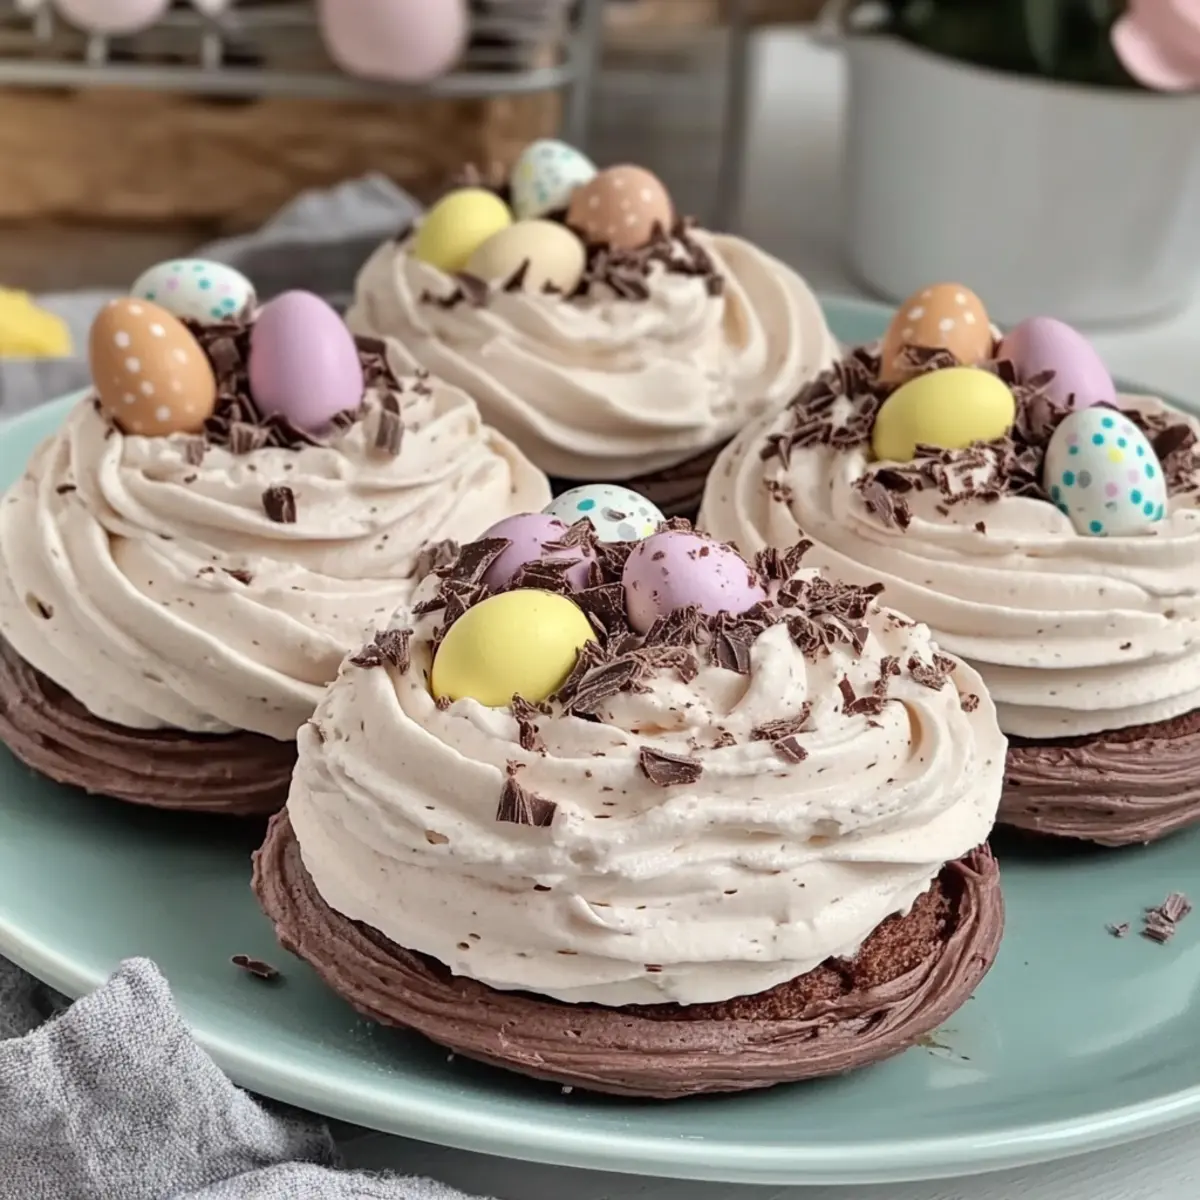
As I stood in my kitchen, the air filled with the sweet aroma of melting chocolate, I couldn’t help but feel a joyful anticipation for what was about to unfold: Chocolate Meringue Easter Nests. These delightful treats are not just perfect for Easter celebrations; they’re also a fun and creative way to elevate any dessert table. With their delicate texture of airy meringue and luscious whipped cream, they promise melt-in-your-mouth moments that steal the show. Plus, they’re gluten-free and incredibly versatile—mix in your favorite fillings, whether it’s seasonal fruits or extra chocolate for a personal twist. Are you ready to whip up a batch and impress your friends and family with these irresistible nests?
Why are Chocolate Meringue Nests a must-try?
Decadent Delight: Each bite combines light, crispy meringue with a luscious creamy filling, delivering an unforgettable texture experience.
Festive Appeal: Perfectly suited for Easter gatherings, these nests make a vibrant centerpiece that will impress your guests.
Versatile Treat: Feel free to swap in your favorite fillings, like Chocolate Chip Banana or seasonal fruits, to customize these delightful bites.
Gluten-Free Goodness: Enjoy these treats without worry, as they cater to gluten-free diets while satisfying your sweet cravings.
Quick and Easy: With basic baking skills, you can whip these up in no time, making them ideal for last-minute dessert plans!
Chocolate Meringue Easter Nests Ingredients
• Here’s everything you need to create your delightful Chocolate Meringue Easter Nests!
For the Meringue
- Dark Chocolate – Adds richness and a deep chocolate flavor; finely grate it for better integration.
- Cocoa Powder – Boosts the chocolate flavor and enhances the meringue’s depth.
- Egg Whites – The essential base for meringue; ensure they’re whipped to stiff peaks for the best texture.
- Cream of Tartar – Stabilizes the egg whites, making your meringue perfectly fluffy; substitute with vinegar if needed.
- Caster Sugar – Sweetens and creates a glossy meringue; add it gradually for the best results.
- Vanilla Extract – Optional, but it enhances the overall flavor of the meringue.
For the Filling
- Double Cream – Provides a rich and creamy texture for the nests; whip it to desired consistency.
- Icing Sugar – Sweetens and stabilizes the whipped cream to keep it fluffy.
For Topping
- Mini Eggs – Adds a fun, festive touch; feel free to substitute with other chocolates or seasonal fruits for variation.
- Dark Chocolate Curls/Sprinkles – Optional garnish that elevates the visual appeal and gives an extra chocolate kick.
Step‑by‑Step Instructions for Chocolate Meringue Easter Nests
Step 1: Preheat Your Oven
Begin by preheating your oven to 100°C (225°F). While the oven heats up, line two baking trays with baking paper, ensuring they are flat and even. This preparation sets the stage for your Chocolate Meringue Easter Nests, allowing them to bake evenly and enabling easy removal once done.
Step 2: Prepare Chocolate Mixture
Grate the dark chocolate and combine it with cocoa powder in a bowl. This mixture will enrich the meringue with a delightful chocolate flavor. Make sure to mix them thoroughly so that the cocoa powder can distribute evenly within the dark chocolate, ensuring a rich, consistent taste throughout your nests.
Step 3: Whip Egg Whites
In a clean, grease-free mixing bowl, whisk egg whites and cream of tartar together until they form stiff peaks. This process takes about 5-7 minutes at medium-high speed with a hand mixer. The meringue should hold its shape firmly when you lift the whisk; this provides the essential structure for your Chocolate Meringue Easter Nests.
Step 4: Incorporate Sugar
Gradually add caster sugar to the whipped egg whites, one spoonful at a time, while continuing to mix. This should take about 5 minutes; you want the sugar to fully dissolve before adding the next spoonful. The meringue should become glossy and stiff—ideal for creating sturdy nests that hold their shape when baked.
Step 5: Fold in Chocolate Mixture
Gently fold the chocolate and cocoa mixture into the meringue using a spatula. This step requires care to maintain the airiness of the whipped egg whites. The goal is to create a uniform batter with swirls of chocolate throughout, ensuring each Chocolate Meringue Easter Nest bursts with rich flavor.
Step 6: Pipe Meringue Nests
Transfer the meringue mixture into a piping bag fitted with a large round tip or simply use a spoon. Pipe small nests onto the prepared baking trays, creating circles about 10 cm (4 inches) wide. Use the back of a spoon to create an indentation in the center of each nest, forming a little cup to hold the filling later.
Step 7: Bake the Meringues
Place the trays in the preheated oven and bake for 1 hour and 30 minutes. Once baked, turn off the oven and leave the meringues inside to cool slowly for at least another hour. This cooling period helps prevent cracking and achieves the perfect texture for your Chocolate Meringue Easter Nests.
Step 8: Whip the Cream
While the nests are cooling, whip the double cream with icing sugar and a splash of vanilla extract until soft peaks form. This fluffy filling will complement the crispy meringue, creating a delightful contrast in textures. Be careful not to over-whip, as you want the cream to remain light and airy.
Step 9: Fill and Decorate
Once the meringue nests are completely cool, fill each nest with the whipped cream. Top them generously with Mini Eggs and, if desired, sprinkle with dark chocolate curls or sprinkles for an extra festive touch. These finishing touches will make your Chocolate Meringue Easter Nests not only delicious but visually stunning as well.
Step 10: Store and Serve
Finally, store any filled Chocolate Meringue Easter Nests in the refrigerator and enjoy them within 2 days for the best flavor and texture. The nests can be kept unfilled in an airtight container at room temperature, making them a perfect make-ahead treat for your Easter celebrations or dessert gatherings.

Chocolate Meringue Easter Nests Variations
Feel free to let your creativity shine by customizing these delightful nests with endless possibilities.
-
Dairy-Free: Substitute whipped cream with coconut cream for a creamy vegan option that’s equally delicious and guilt-free.
The tropical touch of coconut adds an inviting flavor while keeping everything light and airy. -
Fruity Twist: Replace Mini Eggs with fresh berries like strawberries or raspberries for a burst of seasonal freshness.
The vibrant colors and tartness of the fruit will elevate your nests to a whole new level of deliciousness. -
Different Chocolate: Experiment with milk or white chocolate instead of dark chocolate to create unique flavor profiles.
This twist brings a new sweetness and richness that will surprise your taste buds in the best way possible. -
Nutty Crunch: Add crushed nuts, like almonds or hazelnuts, into the meringue for added texture and a delightful crunch.
The nutty flavor complements the chocolate so beautifully—it’s a match made in dessert heaven! -
Minty Fresh: Incorporate peppermint extract into the whipped cream for a refreshing mint chocolate flavor that’s perfect for Easter.
This invigorating twist transforms the nests into delightful treats that will charm everyone at your gathering. -
Spicy Kick: For a surprising twist, add a pinch of cayenne pepper to the meringue for a gentle spicy kick.
The subtle heat contrasts perfectly with the sweetness, giving your guests something to talk about. -
Decorative Sprinkles: Swap out the Mini Eggs for colorful sprinkles for a fun, festive look that kids will adore.
This twist not only enhances the visual appeal but also adds a fun candy crunch to each bite. -
Ganache Filling: Instead of whipped cream, fill the nests with chocolate ganache for a luxurious, chocolatey explosion.
The silky smooth ganache elevates your meringue nests into a dessert that’s rich and utterly indulgent.
For even more sweet inspiration, consider trying out my Chocolate Chip Banana recipe for delightful banana goodness or check out the crunchiness of Dark Chocolate Quinoa for a healthier dessert alternative. Enjoy customizing your Chocolate Meringue Easter Nests!
Expert Tips for Chocolate Meringue Easter Nests
-
Egg Whites Matter: Ensure your egg whites are at room temperature for optimal foaming. Cold egg whites won’t whip to their fullest potential.
-
Grease-Free Bowl: Always use a clean, grease-free mixing bowl. Wipe it with vinegar or lemon juice to ensure the egg whites whip up perfectly for your Chocolate Meringue Easter Nests.
-
Sugar Gradually: Add caster sugar gradually, one spoonful at a time, while whisking. This prevents graininess and helps achieve a glossy, stable meringue.
-
No Peeking: Avoid opening the oven during baking and cooling. This helps prevent cracking and ensures your nests maintain their shape.
-
Moisture Watch: Be cautious when folding in wet ingredients. Any moisture can interfere with the formation of your meringue, so add dry ingredients carefully.
How to Store and Freeze Chocolate Meringue Easter Nests
Airtight Container: Keep unfilled Chocolate Meringue Easter Nests in an airtight container at room temperature for up to 1 week to maintain their crisp texture.
Refrigeration: Once filled with whipped cream, store the nests in the fridge. They are best enjoyed within 2 days for optimal flavor and texture.
Freezer Tips: For longer storage, freeze unfilled meringue nests for up to 1 month. Thaw at room temperature before filling and serving to retain their delightful crunch.
Reheating: Avoid reheating meringues as they are best enjoyed chilled or at room temperature.
Make Ahead Options
These Chocolate Meringue Easter Nests are perfect for meal prep, allowing you to enjoy homemade treats with less last-minute fuss! You can prepare the meringue nests up to 24 hours in advance. Simply bake them according to the recipe and let them cool completely before storing them in an airtight container at room temperature to maintain their crispiness. As for the whipped cream filling, it can be made up to 3 days ahead; just store it in the fridge. When ready to serve, fill the nests with the whipped cream and top with Mini Eggs for a delightful finish. This way, you’ll have these crowd-pleasers ready to impress without the stress!
What to Serve with Chocolate Meringue Easter Nests
Looking to create a full meal that complements these delightful chocolate treats? Let’s explore some perfect pairings!
-
Fresh Berries: Juicy and vibrant, they add a tangy contrast to the sweetness of the nests. The natural acidity of the berries balances the rich chocolate beautifully.
-
Creamy Vanilla Ice Cream: The cool, creamy texture of vanilla ice cream provides a delightful contrast to the crispy meringue nests, making every bite memorable.
-
Coffee or Espresso: A rich coffee enhances the chocolate flavor in the nests, creating a warm, indulgent experience that’s perfect after a festive meal.
-
Light Chardonnay: This wine’s crisp notes pair well with the sweetness of the meringue, adding an elegant touch to your dessert table.
-
Chocolate Fondue: For an extra indulgent treat, serve with a chocolate fondue, allowing guests to dip their nests for a melted chocolate experience.
-
Lemon Sorbet: The refreshing citrus notes offer a palate cleanser between bites while the sweetness of the nests keeps the dessert experience harmonious.
-
Whipped Coconut Cream: A dairy-free option that adds a subtle tropical flavor, striking a lovely balance with the chocolate without overpowering it.
-
Mini Fruit Tarts: Offer a bright, fruity contrast with their buttery crust, balancing well with the airy texture of the meringue nests.
-
Herbal Tea: A soothing herbal infusion can gently complement the dessert’s sweetness, providing a comforting finish to your meal.
Chocolate Meringue Easter Nests Recipe FAQs
How do I choose the right egg whites?
Absolutely! For the best results, choose fresh, room-temperature egg whites. Fresh eggs will whip up to a greater volume, resulting in a lighter meringue. If you’re in a pinch, you can also use carton egg whites; just make sure they’re pure egg whites without additives.
How should I store my filled Chocolate Meringue Easter Nests?
Very simply, once you’ve filled your nests with whipped cream, store them in the refrigerator. They’ll be at their best for up to 2 days. If you’re making them ahead of time, keep the unfilled nests in an airtight container at room temperature for up to 1 week, allowing you to fill them fresh before serving.
Can I freeze Chocolate Meringue Easter Nests?
Yes, you can freeze the unfilled nests! Just place them in an airtight container and they can be frozen for up to 1 month. When you’re ready to enjoy, remove them from the freezer and let them thaw at room temperature. Once they’ve fully thawed, fill them with whipped cream for a delightful treat!
What should I do if my meringue doesn’t hold its shape?
This is a common concern! If your meringue fails to hold its shape, it might be due to moisture or insufficiently whipped egg whites. Ensure that your mixing bowl is completely grease-free, and that you’ve whipped your egg whites to stiff peaks. If you see any dark spots or moisture in the mixture, it can affect the outcome. If all else fails, it might also help to try again with fresh eggs.
Can I make these nests dairy-free or vegan?
Absolutely! To create a dairy-free version, substitute the double cream with coconut cream, which provides a rich texture. For a vegan option, you can use aquafaba (the liquid from canned chickpeas) as a substitute for the egg whites, whipped until stiff peaks form. Just make sure to sweeten it accordingly!
Are Chocolate Meringue Easter Nests suitable for gluten-free diets?
Yes, indeed! These delightful nests are naturally gluten-free since they don’t contain any flour. They are perfect for anyone avoiding gluten but still want to enjoy a sweet treat. Enjoy making these guilt-free delights for your holiday festivities!

Chocolate Meringue Easter Nests: Irresistibly Sweet Bliss
Ingredients
Equipment
Method
- Preheat your oven to 100°C (225°F) and line two baking trays with baking paper.
- Grate the dark chocolate and combine it with cocoa powder in a bowl.
- Whip egg whites and cream of tartar together until stiff peaks form.
- Gradually add caster sugar to the whipped egg whites while continuing to mix.
- Fold the chocolate mixture into the meringue gently.
- Pipe the meringue mixture into small nests on the baking trays.
- Bake for 1 hour and 30 minutes, then cool in the oven.
- Whip the double cream with icing sugar and vanilla extract until soft peaks form.
- Fill each meringue nest with whipped cream and top with Mini Eggs.
- Store filled nests in the refrigerator.
Leave a Reply