
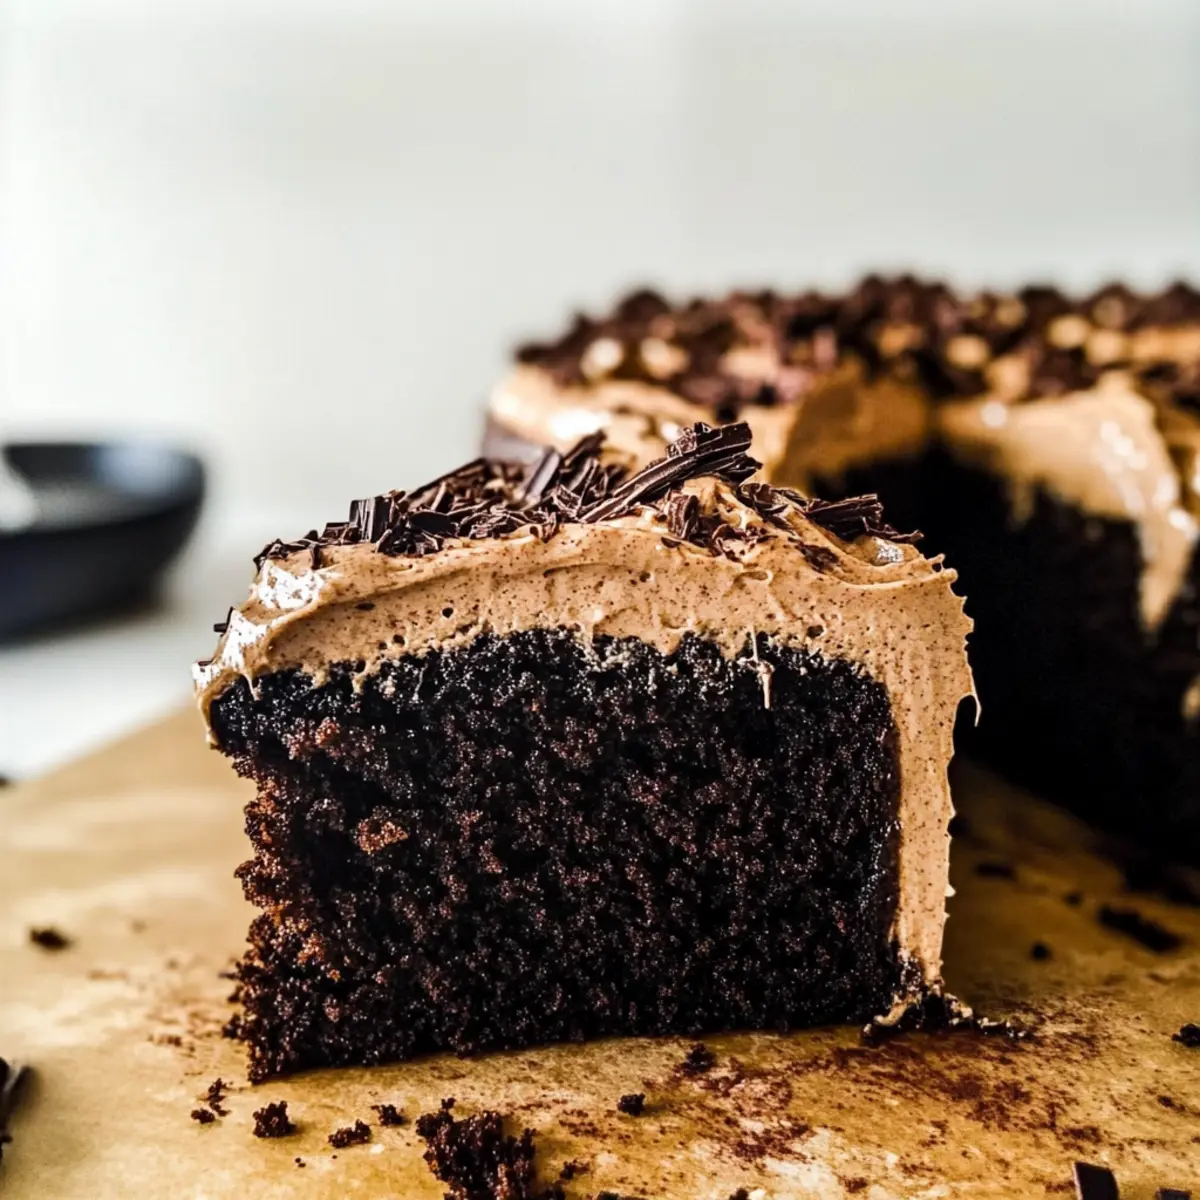
“Have you ever found yourself in a moment of pure bliss, savoring that first bite of a rich chocolate cake? Let me introduce you to my version of comfort: the One Bowl Chocolate Espresso Cake. This vegan, dairy-free delight takes you on a decadent journey with luscious flavors while being completely eggless. I love how this cake comes together effortlessly in just one bowl, making it a quick and easy dessert for any occasion. Not only does it wow your guests with its deep chocolate essence shot through with a hint of espresso, but it’s also a guilt-free indulgence with options to customize for gluten-free needs. Curious how to impress the crowd with this deliciously moist cake topped with a creamy espresso-infused frosting? Let’s dive into this scrumptious recipe!”
Why Is This Cake a Must-Try?
Simplicity at its finest: The one-bowl method makes preparation a breeze, allowing anyone to whip up a delicious cake in no time.
Decadent flavor: The rich mixture of black cocoa and espresso powder creates a bold taste that chocolate lovers dream of.
Customizable: Whether you’re looking to make it gluten-free or want to throw in some nuts for a delightful crunch, the options are endless!
Crowd-pleaser: Perfect for gatherings, this cake will dazzle your friends and family, leaving them asking for more!
Guilt-free indulgence: Say goodbye to dairy and eggs without sacrificing taste, making it suitable for everyone, including those with dietary restrictions.
Plus, if you’re a fan of treats like Chocolate Chip Banana or Blueberry Cheesecake Protein, this cake will become an instant favorite! Enjoy that first bite of bliss—you’re in for a treat!
Chocolate Espresso Cake Ingredients
For the Batter
• Flour – Provides structure to the cake; use all-purpose or gluten-free flour as substitutes.
• Sugar – Adds sweetness and moisture; adjust sugar levels based on your taste preference.
• Light Brown Sugar – Enhances moisture and depth of flavor; can be substituted with coconut sugar for a healthier option.
• Dairy-Free Yogurt/Vegan Sour Cream – Adds moisture and a slight tang; can be replaced with applesauce or mashed bananas.
• Neutral Oil (e.g., vegetable oil) – Acts as fat for moisture; melted vegan butter can also be used.
• Vegan Heavy Cream – Mimics the richness of milk/cream in baking; substitute with almond milk or coconut cream if unavailable.
• Espresso Powder – Infuses the cake with a lovely coffee flavor; instant coffee works in a pinch but lacks intensiveness.
• Black Cocoa Powder – This gives the cake a deep, rich flavor; regular cocoa powder can be used, but the depth will differ.
• Baking Powder & Baking Soda – Essential for leavening and achieving a light texture.
• Salt – Balances the sweetness and enhances flavor.
For the Frosting
• Dairy-Free Cream Cheese – Delivers creaminess to the frosting; regular cream cheese can be substituted but won’t be vegan.
• Vegan Butter – Ensures a buttery flavor in the frosting; standard butter can be used for non-vegan options.
• Espresso Powder – Intensifies the coffee flavor; adjust according to preference.
• Powdered Sugar – Sweetens and thickens the frosting; use more or less to achieve desired sweetness.
Indulge in this Chocolate Espresso Cake to delight your taste buds while catering to your vegan lifestyle! Enjoy whipping it up!
Step‑by‑Step Instructions for One Bowl Chocolate Espresso Cake
Step 1: Preheat the Oven
Begin by preheating your oven to 350°F (175°C). While the oven warms up, prepare a round 9-inch cake pan by lining the bottom with parchment paper and lightly greasing the sides with a bit of oil. This will ensure your delicious Chocolate Espresso Cake releases easily after baking.
Step 2: Mix the Dry Ingredients
In a large mixing bowl, combine the flour, granulated sugar, light brown sugar, black cocoa powder, baking powder, baking soda, and salt. Whisk them together until evenly blended, ensuring there are no lumps, as this will create the perfect base for your cake. Take a moment to appreciate the rich chocolate aroma filling your kitchen!
Step 3: Combine the Wet Ingredients
In another bowl, whisk together the dairy-free yogurt, neutral oil, and vegan heavy cream until they form a smooth mixture. This wet blend is crucial for keeping your Chocolate Espresso Cake moist and flavorful. Once mixed, pour this wet mixture into the bowl containing the dry ingredients, and prepare to blend these delightful components.
Step 4: Create the Cake Batter
Gently fold the wet ingredients into the dry ones using a spatula or wooden spoon, mixing just until combined. Avoid over-mixing to ensure a tender texture in your cake. When the batter is nearly done, add in the espresso powder and fold it in carefully, allowing the rich coffee flavor to infuse the chocolatey goodness.
Step 5: Bake the Cake
Pour the thick batter into the prepared cake pan, spreading it evenly with a spatula for a uniform rise. Place the pan in the preheated oven and bake for about 65 minutes, or until a toothpick inserted into the center comes out clean. Keep an eye on it as it bakes—your home will soon be filled with the inviting scent of Chocolate Espresso Cake!
Step 6: Cool the Cake
Once the baking time is up, remove the cake from the oven and let it cool in the pan for about 10 minutes. Then, carefully transfer the cake onto a wire rack to cool completely. Take your time with this step—the cake must be fully cooled before adding the frosting to prevent it from melting away!
Step 7: Prepare the Frosting
While the cake cools, prepare the creamy frosting. In a mixing bowl, combine the dairy-free cream cheese, vegan butter, espresso powder, and powdered sugar. Beat the mixture until it becomes smooth and fluffy. Adjust the sweetness by adding more powdered sugar if desired. The delightful aroma of espresso will make this step incredibly tempting!
Step 8: Frost the Cake
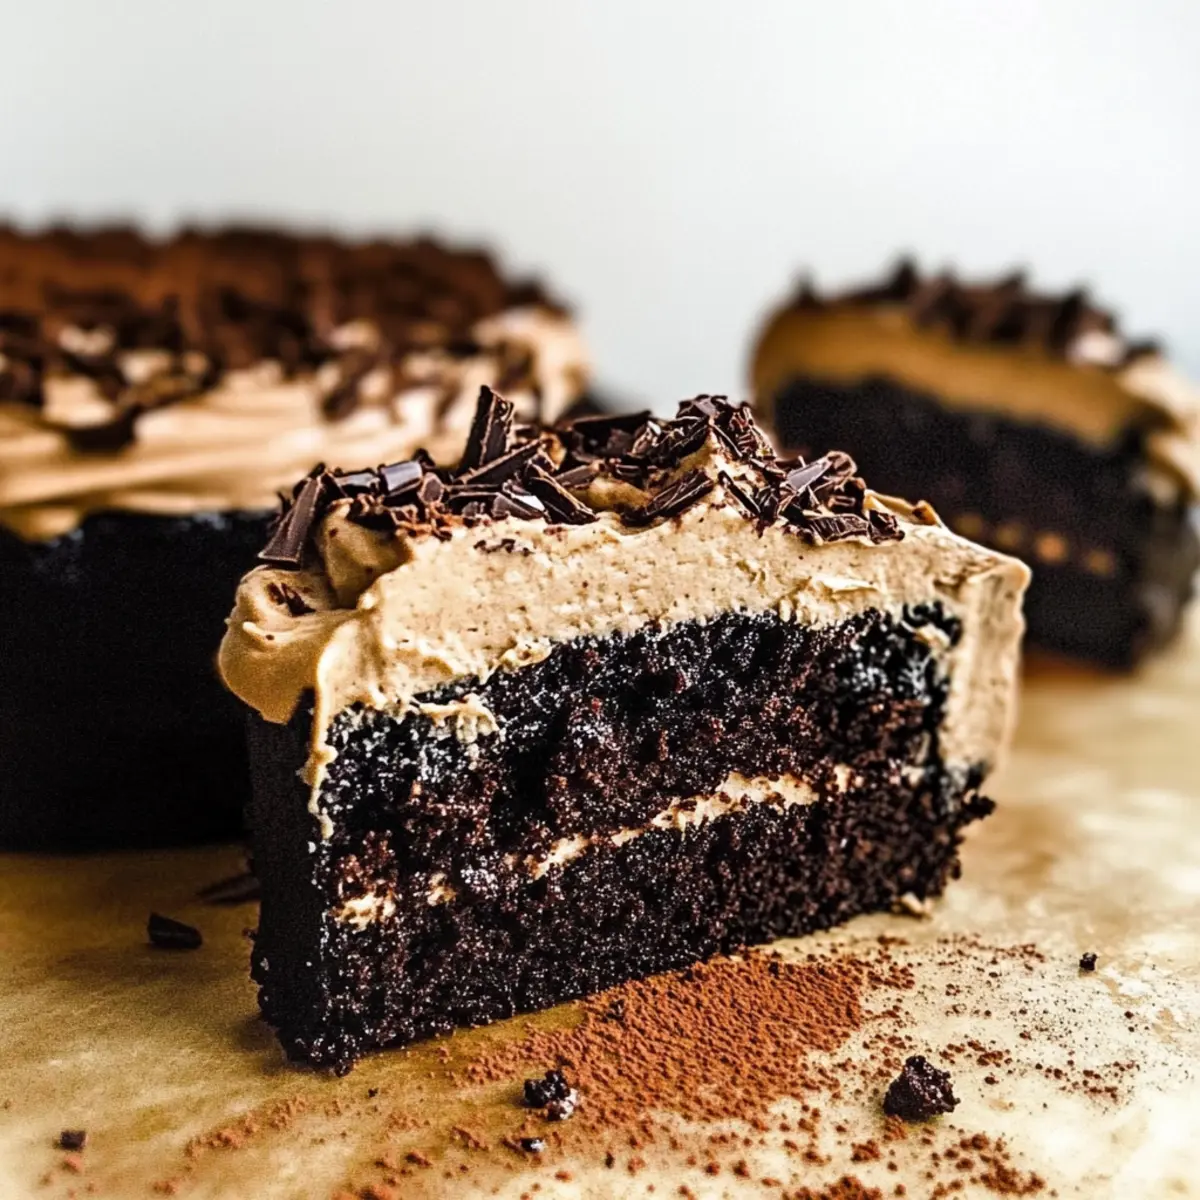
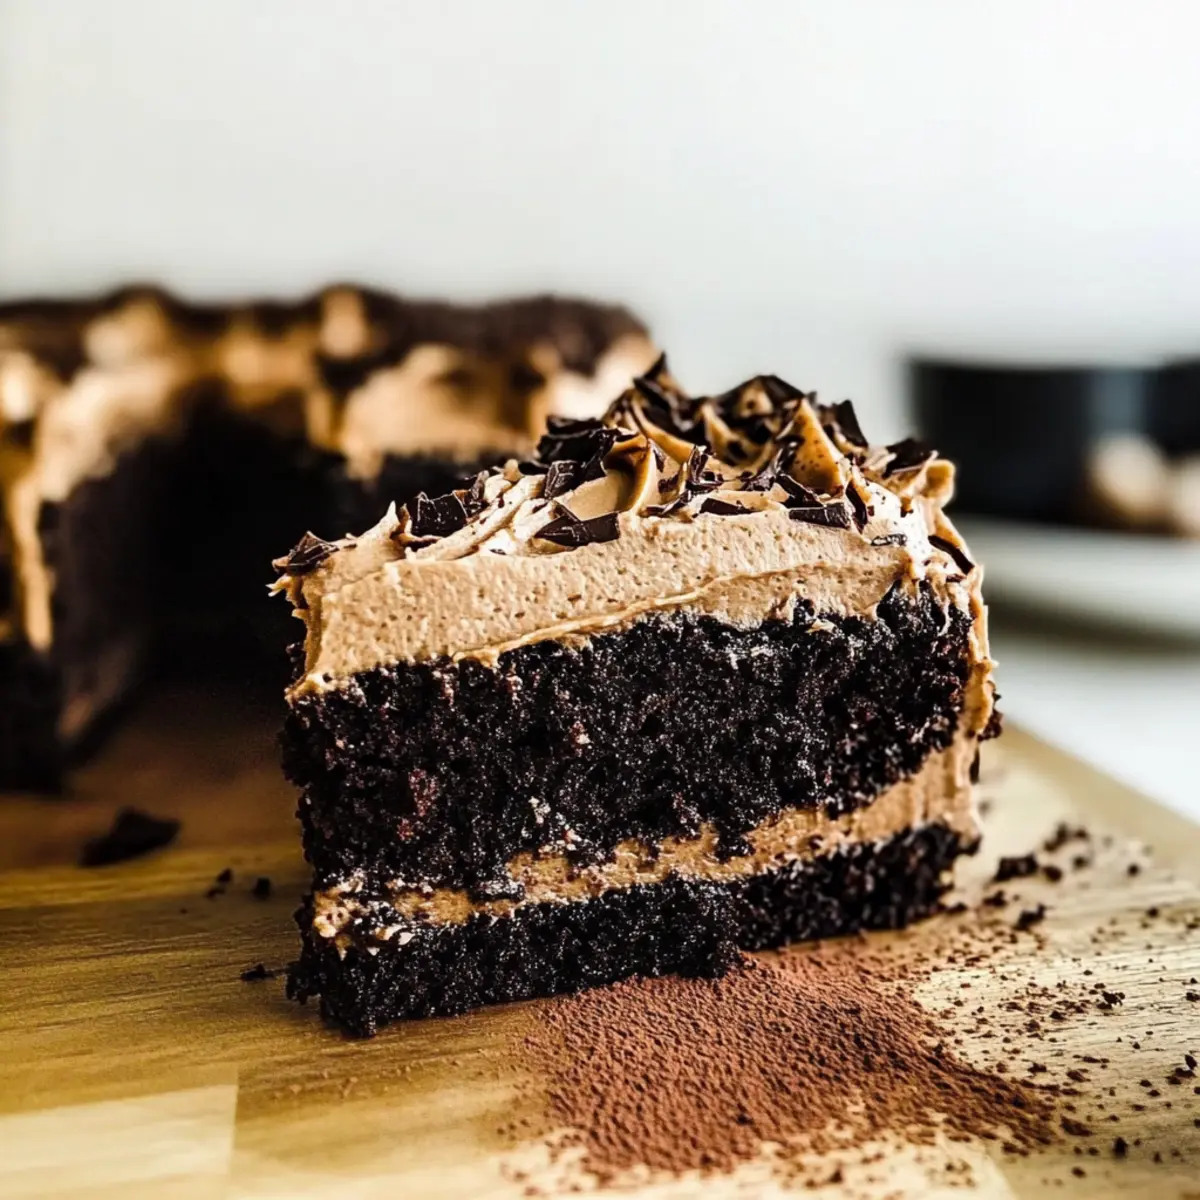
Once the cake has cooled completely, use a spatula to spread the luscious espresso frosting evenly over the top and sides. Take your time to create a beautiful finish; this is where your One Bowl Chocolate Espresso Cake shines. If you like, dust the top with cocoa powder or sprinkle with chocolate curls for an extra touch of elegance.
Step 9: Serve and Enjoy
Slice your stunning Chocolate Espresso Cake and serve it to eager taste buds. You might consider pairing each slice with a dusting of cocoa or a dollop of vegan whipped cream for an added indulgence. This cake is perfect for any gathering, turning a simple dessert into a show-stopping delight that everyone can enjoy!
What to Serve with One Bowl Chocolate Espresso Cake?
Indulging in a slice of rich chocolate goodness deserves a delightful accompaniment to elevate your dessert experience.
- Creamy Vegan Ice Cream: The coolness of vegan ice cream against warm cake offers blissful contrast, creating a dreamy pairing.
- Fresh Berries: A burst of tartness from raspberries or strawberries balances the cake’s sweetness while adding a pop of color.
- Espresso or Coffee: Complement the chocolate espresso cake with a cup of rich espresso or a creamy coffee, enhancing its flavors.
- Coconut Whipped Cream: Light and fluffy coconut cream adds a tropical twist, providing a luxurious finish to every bite.
- Chocolate-Covered Espresso Beans: These add a delightful crunch and intensify the coffee flavor, making your dessert experience even more exciting.
- Nutty Granola: Sprinkle a handful of granola for a crunchy texture, melding beautifully with the cake’s soft, moist crumb.
- Vegan Chocolate Mousse: For an extra indulgence, serve a dollop of smooth mousse that echoes the chocolatey theme, creating a heavenly dessert duo.
- Mint Tea: A refreshing mint tea can cleanse the palate and offers a soothing end to a deliciously rich meal.
The harmony of flavors and textures in these pairings will surely leave your guests in awe of this chocolate espresso cake!
Expert Tips for Chocolate Espresso Cake
-
Cooling First: Always let the cake cool completely before frosting. This prevents the frosting from melting and sliding off, ensuring a beautiful finish.
-
Perfectly Mixed: Avoid over-mixing your batter! Fold the ingredients just until combined for a fluffy, tender chocolate espresso cake texture.
-
Flavor Adjustment: Feel free to adjust the espresso powder in the frosting and batter according to your taste. A stronger espresso flavor enhances the cake’s richness!
-
Baking Time Caution: Keep an eye on the cake as it bakes. Every oven is different; checking a few minutes early can help prevent over-baking.
-
Frosting Variation: Experiment with different frostings! While the espresso cream cheese frosting is delightful, a vanilla buttercream also pairs beautifully with this chocolate espresso cake.
Chocolate Espresso Cake Variations
Feel free to make this delightful cake your own with these exciting twists and substitutions!
-
Lower-Fat Option: Substitute any oil with unsweetened applesauce for a lighter version without sacrificing moisture.
This simple swap keeps your cake tender and delicious while lowering the fat content, perfect for guilt-free indulgence! -
Nutty Crunch: Add 1/2 cup of chopped walnuts or pecans for delightful texture and flavor.
Nuts not only add a satisfying crunch but also elevate the richness of the chocolate espresso experience! -
Extra Chocolate: Toss in 1/2 cup of vegan chocolate chips for a more indulgent cake.
These melty pockets of chocolate will create a wonderful surprise in every bite! -
Dairy-Free Cream Cheese Frosting: Swap out the espresso for vanilla extract in the frosting for a different flavor dimension.
This variation creates a smooth balance between the rich cake and a sweeter, lighter frosting. -
Coconut Twist: Replace almond milk with coconut cream for a tropical flair.
The coconut not only adds richness but also a subtle sweetness that complements the chocolate beautifully. -
Spice It Up: Add a pinch of cinnamon or chili powder for a hint of warmth and sweetness.
This twist can transform your cake into an exciting dessert with a little extra kick! -
Gluten-Free Variant: Use a 1:1 gluten-free flour blend in place of all-purpose flour for a gluten-free option.
Your cake will remain just as moist and delicious, ensuring everyone can enjoy it! -
From Cake to Cupcakes: Divide the batter into cupcake liners for delightful individual servings!
This makes for perfect party treats, just adjust baking time to about 20-25 minutes.
And if you’re in the mood for something equally tempting, check out my favorite Dark Chocolate Quinoa recipe or whip up a batch of Angel Cake Churro bites for your next gathering!
Make Ahead Options
These One Bowl Chocolate Espresso Cakes are perfect for busy home cooks looking to save time on meal preparation! You can prepare the cake batter up to 24 hours in advance by mixing the dry ingredients and wet ingredients separately, then combining them just before baking to maintain freshness. Store the batter in the refrigerator for optimal results. Once baked, allow the cake to cool completely, then cover it with plastic wrap and refrigerate for up to 3 days. When you’re ready to serve, simply frost the chilled cake with your dairy-free espresso frosting for a delectable treat that tastes just as delicious as the day it was made!
How to Store and Freeze Chocolate Espresso Cake
Room Temperature: You can keep the cake covered at room temperature for up to 2 days. Just ensure it’s in an airtight container or wrapped to maintain freshness.
Fridge: For longer storage, refrigerate leftover Chocolate Espresso Cake in an airtight container for up to a week. This helps retain moisture and flavor.
Freezer: To freeze, wrap the cooled cake tightly in plastic wrap and aluminum foil. It can be frozen for up to 3 months. Thaw overnight in the fridge before serving.
Reheating: When ready to enjoy, you can slice and gently warm pieces in the microwave for about 10-15 seconds or enjoy chilled!
One Bowl Chocolate Espresso Cake Recipe FAQs
How do I choose the right flour for my cake?
Absolutely! For this One Bowl Chocolate Espresso Cake, you can use all-purpose flour for a traditional texture, or opt for a gluten-free blend if dietary needs require it. Just ensure your gluten-free flour blend contains xanthan gum for best results.
How should I store any leftovers of the cake?
For room temperature storage, keep the cake covered for up to 2 days in an airtight container. If you’re looking to store it longer, refrigerate the cake, where it will stay fresh for up to a week. Always ensure it’s wrapped or in a container to maintain moisture.
Can I freeze Chocolate Espresso Cake? How?
Certainly! To freeze your delicious cake, first make sure it has completely cooled. Wrap the cooled cake tightly in plastic wrap followed by aluminum foil to ensure it doesn’t suffer freezer burn. It will remain delicious for up to 3 months! For best results, thaw overnight in the fridge when you’re ready to enjoy it again.
What should I do if my cake turns out dry?
If you find your cake is a bit dry, it could be due to over-baking. Make sure to check for doneness a few minutes early by inserting a toothpick; it should come out clean but not dry. Adding a bit more dairy-free yogurt or oil to the batter can also help keep it moist in the future!
Is this cake safe for those with nut allergies?
Great question! The basic recipe doesn’t include nuts, making it suitable for nut allergies. However, always check that your substitutions, like dairy-free yogurts or creams, are made in nut-free facilities to ensure safety for those with allergies.
Can I adjust the sweetness in this recipe?
Very much! You can easily adjust the amount of sugar in the cake batter or frosting to fit your personal taste. For a healthier option, consider using sweeteners like coconut sugar or maple syrup, but be sure to adjust the wet ingredients accordingly to maintain the cake’s moisture.

Decadent Chocolate Espresso Cake – Dairy-Free Delight!
Ingredients
Equipment
Method
- Preheat your oven to 350°F (175°C) and prepare a round 9-inch cake pan by lining with parchment paper and greasing the sides.
- In a large mixing bowl, combine the dry ingredients: flour, granulated sugar, light brown sugar, black cocoa powder, baking powder, baking soda, and salt. Whisk until blended.
- In another bowl, whisk together the wet ingredients: dairy-free yogurt, neutral oil, and vegan heavy cream until smooth. Pour into the dry ingredients and mix gently.
- Fold the batter until just combined and then add the espresso powder, folding in carefully.
- Pour the batter into the prepared cake pan and bake for about 65 minutes, or until a toothpick comes out clean.
- Remove the cake from the oven and let it cool in the pan for about 10 minutes before transferring it to a wire rack to cool completely.
- Prepare the frosting by beating together dairy-free cream cheese, vegan butter, espresso powder, and powdered sugar until smooth and fluffy.
- Once the cake has cooled, spread the frosting evenly on top and sides of the cake.
- Serve and enjoy! Optionally, dust with cocoa powder or sprinkle with chocolate curls.
Leave a Reply