
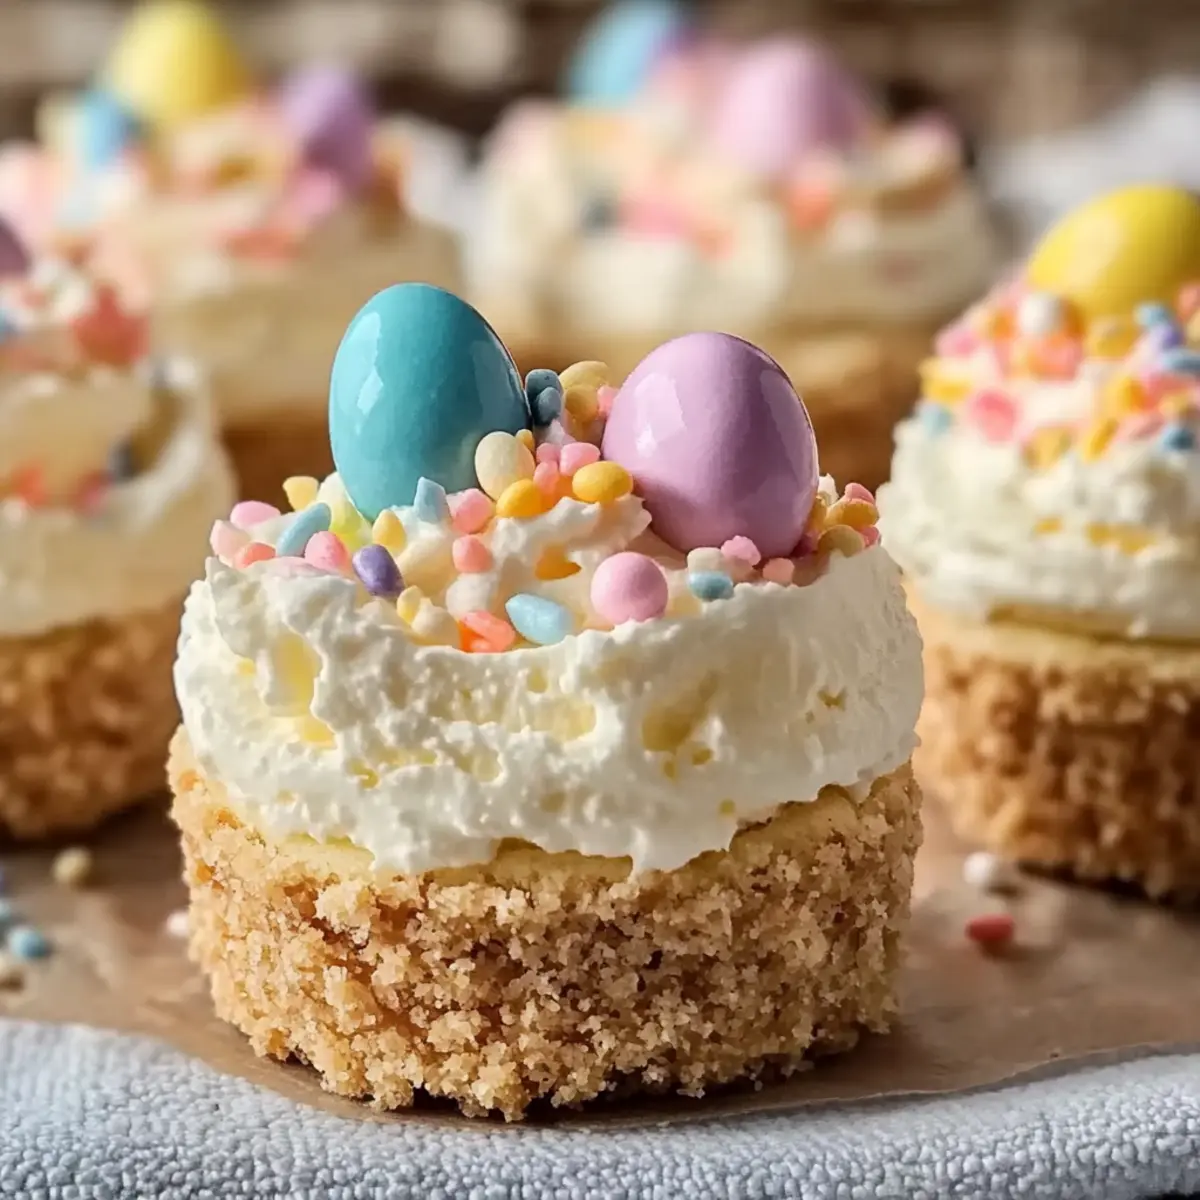
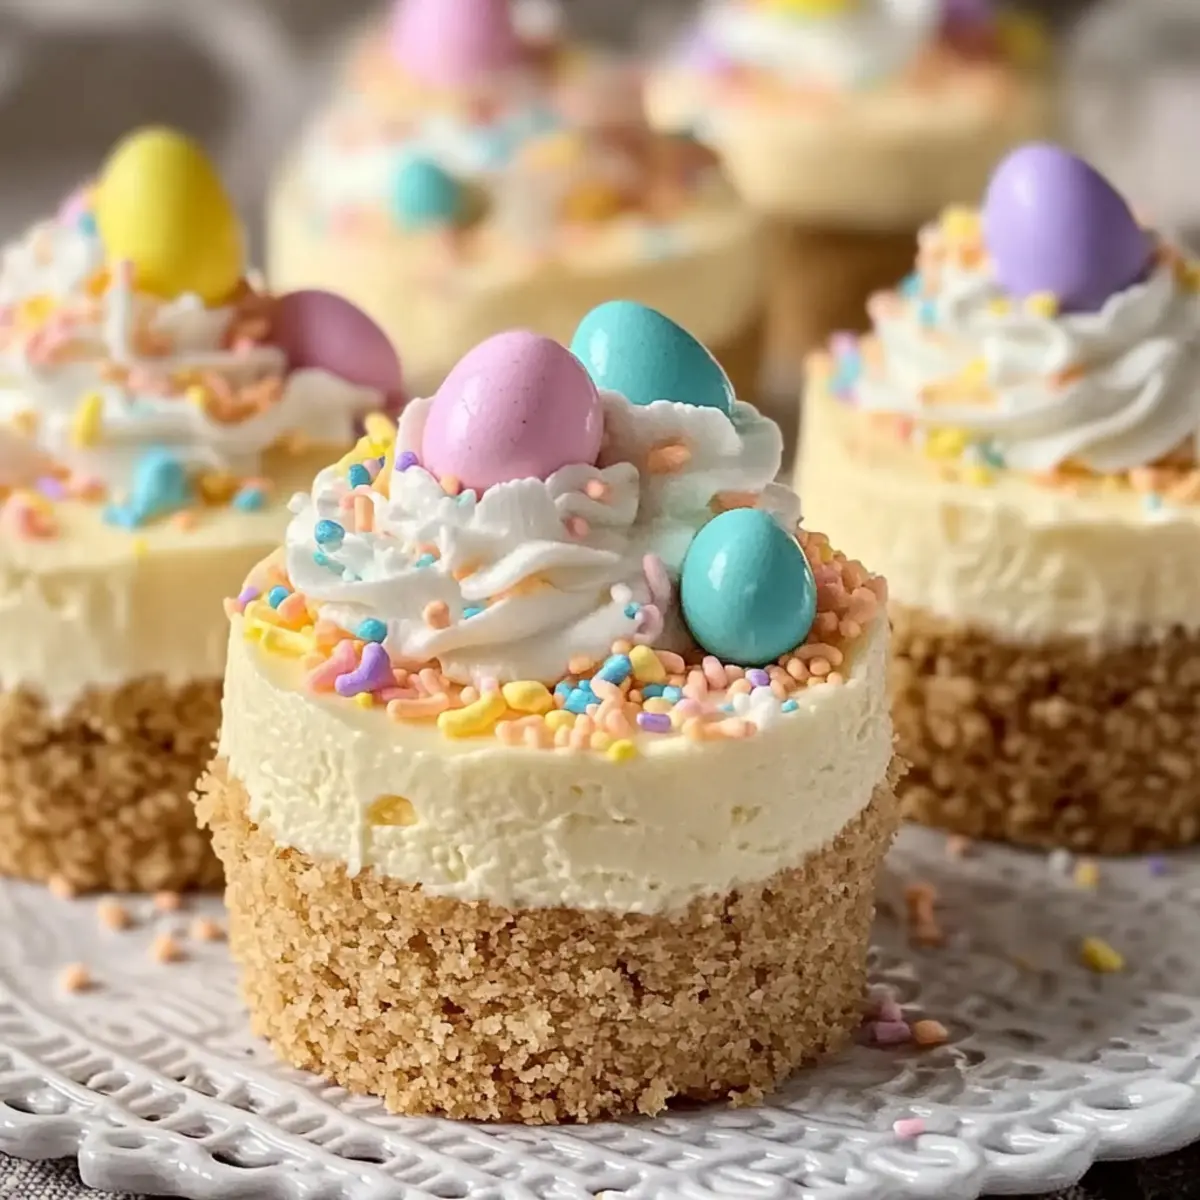
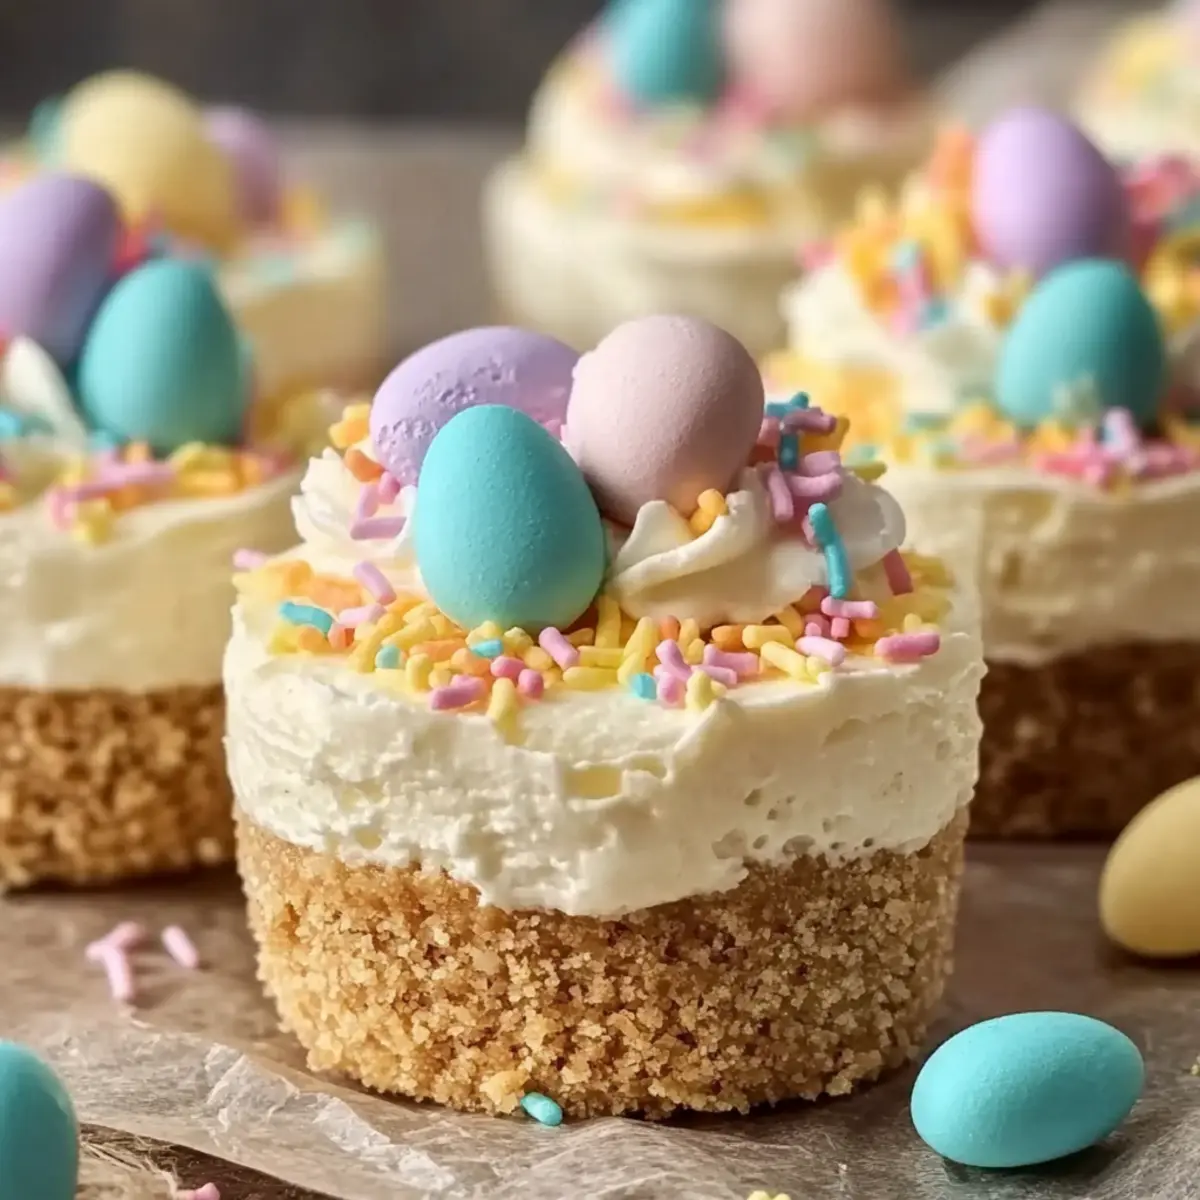
As the sweet scent of spring fills the air, let’s take a moment to celebrate the season with something truly delightful—Easter No-Bake Mini Cheesecakes! These charming little treats not only save you from turning on the oven, but they also bring a festive touch to your table with their vibrant pastel colors and whimsical toppings. With just 20 minutes of prep time, this vegetarian-friendly dessert is perfect for busy home chefs who crave a deliciously creamy indulgence without the hassle of baking. Whether you’re hosting a family gathering or just treating yourself, these mini cheesecakes are sure to impress. So, are you ready to whip up some springtime magic in your kitchen?

Why are these cheesecakes perfect for Easter?
Quick Prep Time: These Easter No-Bake Mini Cheesecakes come together in just 20 minutes, allowing you to spend more time enjoying the festivities.
Light and Creamy: The combination of whipped cream and cream cheese creates a delightful, airy filling that melts in your mouth.
Visually Stunning: With their pastel colors and festive toppings, they are not just desserts but beautiful centerpieces for your celebrations.
Crowd-Pleasing Delight: Perfect for gatherings, these mini cheesecakes are sure to impress both family and friends, making them a hit at any party.
Versatile Options: Customize flavors or toppings to suit your taste—consider adding fresh fruit like berries or experimenting with Mini Dutch Baby variations.
Easter No-Bake Mini Cheesecakes Ingredients
For the Crust
- Graham Cracker Crumbs – Provides the crust structure and crunch; you can use store-bought crusts to save time.
- Unsalted Butter – Helps bind the crust together and adds richness; ensure it is melted for the best results.
- Granulated Sugar – Adds sweetness to the crust; feel free to reduce or substitute with a sugar alternative for a lighter touch.
For the Filling
- Cream Cheese – Acts as the main filling, contributing creaminess and tang; ensure it’s softened to prevent lumps.
- Powdered Sugar – Adds sweetness to the filling and dissolves well for a smooth texture; it enhances the cheesecake flavor beautifully.
- Vanilla Extract – Enhances the flavor profile of the filling, giving it that comforting homemade taste.
- Heavy Whipping Cream – Whipped to stiff peaks for a light, airy filling texture; substitute half with Greek yogurt for added protein.
For the Toppings
- Pastel-colored Candy Melts – Used for drizzling over the cheesecakes for decoration; customize colors for different occasions.
- Mini Chocolate Eggs or Jelly Beans – Decorative toppings that add a festive look, making your cheesecakes even more appealing.
- Easter-themed or Pastel Sprinkles – Final decoration that enhances visual appeal and ties in the Easter theme perfectly.
Now that you have all your ingredients lined up, you’re just a step away from making these delightful Easter No-Bake Mini Cheesecakes that will surely brighten your celebration!
Step‑by‑Step Instructions for Easter No-Bake Mini Cheesecakes
Step 1: Prepare the Crust
In a mixing bowl, combine graham cracker crumbs, melted unsalted butter, and granulated sugar. Stir until the mixture resembles wet sand, ensuring everything is evenly incorporated. This will create a sturdy base for your Easter No-Bake Mini Cheesecakes.
Step 2: Press into Muffin Tin
Line a muffin tin with paper liners for easy removal. Take the crust mixture and press it firmly into the bottom of each muffin liner, ensuring an even layer. Use the back of a spoon or your fingers to pack it tightly. This step is essential for achieving a solid crust.
Step 3: Chill the Crust
Place the muffin tin in the refrigerator for about 15 minutes. Chilling the crust will allow it to set properly, making it easier to fill later. This is a perfect time to prepare your cheesecake filling.
Step 4: Beat Cream Cheese
In a large mixing bowl, add softened cream cheese. Using an electric mixer, beat it on medium speed until smooth and creamy, about 2 minutes. This will be the foundation of your creamy cheesecake filling, so make sure there are no lumps.
Step 5: Add Sugar and Vanilla
Gradually mix in powdered sugar and vanilla extract with the cream cheese. Continue beating until fully combined, ensuring a smooth consistency without any lumps. This sweet, creamy mixture will form the heart of your Easter No-Bake Mini Cheesecakes.
Step 6: Whip the Cream
In a separate, chilled bowl, pour in heavy whipping cream. Use an electric mixer to whip the cream until stiff peaks form, which should take about 3-5 minutes. Properly whipped cream adds lightness to the cheesecake filling.
Step 7: Fold Whipped Cream
Gently fold the whipped cream into the cream cheese mixture using a spatula. Be careful not to deflate the whipped cream, as it adds a delightful airy texture to the filling. This technique is crucial for achieving that light and fluffy texture.
Step 8: Fill the Crusts
Spoon or pipe the creamy filling into each chilled crust, ensuring it fills each cup evenly. Smooth the tops with a spatula or the back of a spoon for a neat finish. Your Easter No-Bake Mini Cheesecakes are now ready for chilling!
Step 9: Refrigerate to Set
Cover the muffin tin with plastic wrap and refrigerate for at least 2 hours, or until the filling is firm. This chilling time allows the flavors to meld and ensures a perfect cheesecake texture.
Step 10: Melt Candy Melts
While the cheesecakes are chilling, follow the package instructions to melt the pastel-colored candy melts in a microwave-safe bowl. Heat in short bursts, stirring until smooth. This colorful drizzle will add a delightful touch to your finished mini cheesecakes.
Step 11: Drizzle Over Cheesecakes
Once the cheesecakes have set, remove them from the refrigerator. Use a spoon or piping bag to drizzle the melted candy over each cheesecake in a fun, decorative manner. Let the vibrant colors flow to bring the Easter spirit to life!
Step 12: Add Toppings
Finally, top each cheesecake with mini chocolate eggs, jelly beans, and pastel sprinkles for that festive flair. These toppings will not only enhance the visual appeal but also add a pop of fun to your Easter No-Bake Mini Cheesecakes.
Easter No-Bake Mini Cheesecakes Variations
Feel like adding a personal touch to your Easter No-Bake Mini Cheesecakes? Here are some delightful twists to inspire your creativity!
-
Fruit-Infused: Add pureed strawberries or raspberries into the filling for a burst of fruity flavor. It’s a refreshing twist that balances sweetness with tang.
-
Nutty Delight: Incorporate finely chopped nuts, such as pecans or almonds, into the crust. This adds a crunchy texture that contrasts beautifully with the creaminess of the filling.
-
Chocolate Lovers: Substitute half of the cream cheese with melted dark chocolate for a rich, chocolate cheesecake flavor. This indulgent version will satisfy any chocolate craving!
-
Citrus Zing: Consider adding lemon or lime zest to the filling for a vibrant citrus flavor. This zesty addition brightens up the creamy profile and is utterly refreshing.
-
Spiced Up: Sprinkle in a bit of cinnamon or nutmeg to the filling or crust for a warm, cozy flavor. This is especially delightful in springtime gatherings.
-
Festival Colors: Try using colored whipped cream or candy melts for a fun visual appeal. Mix and match colors to create a cheerful Easter vibe that’s perfect for the season.
-
Healthy Swap: Replace heavy cream with Greek yogurt for a lighter filling. This adds protein while still yielding a creamy texture, making it both delicious and nutritious.
As you experiment, consider pairing your mini cheesecakes with delightful options like Mini Dutch Baby or indulging in a light No-Bake Gingerbread Cheesecake Cups variation! Remember, the kitchen is where creativity thrives, so have fun crafting your own festive treats this Easter!
Expert Tips for Easter No-Bake Mini Cheesecakes
-
Room Temperature Cream Cheese: Ensure cream cheese is at room temperature for easy mixing and a smooth filling, preventing any lumps from forming.
-
Stiff Peaks Matter: Whip the cream until stiff peaks form; this creates the light, airy texture essential for your filling. Under-whipping can lead to a dense cheesecake.
-
Chill for Firmness: Don’t skip the chilling steps. Allow the crust and filled cheesecakes to set properly in the fridge for a solid texture and flavor development.
-
Decorative Drizzling: Melt the candy melts carefully; overheating can cause them to seize. Drizzling should be fun and free-flowing to enhance the festive look of your Easter No-Bake Mini Cheesecakes.
-
Substitutions: If you’re short on time, consider using pre-made crusts, which save you the crust preparation steps and still deliver on taste.
Make Ahead Options
These Easter No-Bake Mini Cheesecakes are perfect for busy home cooks looking to save time ahead of holiday gatherings! You can prepare the crust and filling up to 24 hours in advance. Simply follow the steps to make the crust and fill the mini cheesecakes, then cover and refrigerate overnight. This allows the flavors to meld beautifully, ensuring they are just as delicious the next day. When it’s time to serve, simply add the melted candy drizzle and festive toppings. This strategy not only streamlines your dessert prep but also gives you more time to enjoy the festivities with family and friends!
What to Serve with Easter No-Bake Mini Cheesecakes
Add a touch of spring to your dessert table with delightful partners that enhance the flavors and celebration of these mini cheesecakes.
- Fresh Fruit Salad: Bursting with vibrant colors, this mix of strawberries, blueberries, and kiwis brings a refreshing contrast to the creamy cheesecakes.
- Fluffy Whipped Cream: Serve a dollop of light, fluffy whipped cream on the side to add extra indulgence and elevate the dessert’s presentation.
Enhance your guests’ experience with texture and flavor contrasts. Consider pairing these cheesecakes with a warm, spiced tea for a cozy touch.
- Chocolate-Covered Strawberries: The sweetness of chocolate complements the tangy cheesecake, making for a decadent combination that’s visually stunning as well.
- Sparkling Lemonade: A crisp and refreshing beverage with a hint of citrus zest paired with the mini cheesecakes is sure to brighten the occasion.
- Pistachio Cookies: These crunchy, nutty treats add a delightful crunch, balancing the smoothness of the Easter No-Bake Mini Cheesecakes splendidly.
Storage Tips for Easter No-Bake Mini Cheesecakes
Fridge: Store in an airtight container for up to 5 days. Keeping them chilled ensures the creamy texture remains intact for a delightful treat.
Freezer: These cheesecakes can be frozen for up to 1 month. Wrap each one individually in plastic wrap and place in a freezer-safe container to preserve freshness.
Thawing: To serve frozen Easter No-Bake Mini Cheesecakes, thaw them in the fridge overnight for a smooth consistency before indulging.
Room Temperature: Avoid leaving these mini cheesecakes at room temperature for more than 2 hours to maintain food safety and quality.
Easter No-Bake Mini Cheesecakes Recipe FAQs
What should I look for when selecting cream cheese?
Absolutely! When choosing cream cheese, opt for a block of full-fat, rather than spreadable cream cheese, which often contains stabilizers and extra ingredients. Make sure it’s at room temperature before use to ensure a smooth consistency and prevent lumps in your filling.
How should I store the Easter No-Bake Mini Cheesecakes?
Very! Store your mini cheesecakes in an airtight container in the fridge for up to 5 days. Keeping them chilled will maintain their texture and flavor, ensuring they’re just as creamy and delightful on day five as they were on the first!
Can I freeze the cheesecakes?
Yes! To freeze your Easter No-Bake Mini Cheesecakes, wrap each one individually in plastic wrap and place them inside a freezer-safe container. They can be kept for up to 1 month. When ready to enjoy, simply thaw them overnight in the fridge for the best texture.
What if my cream doesn’t whip to stiff peaks?
No worries! If your cream isn’t whipping up to stiff peaks, ensure your bowl and beaters are completely clean and dry. Whip the cream on medium to high speed, and if it still doesn’t reach stiff peaks after about 5 minutes, consider re-chilling the cream and try again. Cold cream whips best, and a bit more air will help achieve that light, airy consistency.
Are there any dietary considerations for this recipe?
Absolutely! This recipe is vegetarian-friendly. If you’re considering dietary restrictions further, you can substitute the cream cheese with a non-dairy cream cheese alternative for a vegan version, though keep in mind that it might alter the texture slightly. Always check labels for allergens if serving to guests with food sensitivities, particularly with candy toppings and the cookies used for the crust!
Can I use flavored whipped cream or add extracts for variation?
Very much! If you want to add a twist to your Easter No-Bake Mini Cheesecakes, consider using flavored whipped cream, like vanilla or almond, or even fold in a bit of lemon or orange zest for a fresh pop of flavor. These small adjustments can elevate your cheesecake experience even more!
Easter No-Bake Mini Cheesecakes for a Sweet Spring Treat
Ingredients
Equipment
Method
- In a mixing bowl, combine graham cracker crumbs, melted unsalted butter, and granulated sugar. Stir until the mixture resembles wet sand.
- Line a muffin tin with paper liners. Press the crust mixture firmly into the bottom of each liner.
- Refrigerate the crust for about 15 minutes to set.
- Beat softened cream cheese using an electric mixer until smooth and creamy, about 2 minutes.
- Gradually mix in powdered sugar and vanilla extract with the cream cheese until fully combined.
- In a separate bowl, whip heavy whipping cream until stiff peaks form, about 3-5 minutes.
- Gently fold the whipped cream into the cream cheese mixture.
- Spoon or pipe the creamy filling into each chilled crust.
- Cover with plastic wrap and refrigerate for at least 2 hours until firm.
- Melt the pastel-colored candy melts according to package instructions.
- Drizzle the melted candy over each cheesecake.
- Top each cheesecake with mini chocolate eggs, jelly beans, and pastel sprinkles.
Leave a Reply