
There’s something undeniably magical about transforming simple ingredients into delightful homemade Cadbury Creme Bites. Picture this: rich, creamy filling nestled between layers of luscious milk chocolate, ready to bring a burst of sweetness to your Easter celebrations. This recipe is not just a crowd-pleaser, but it’s also incredibly easy to whip up, making it perfect for busy home-chefs like you. As we venture into this delightful creation, you’ll find that crafting your own candy offers a sense of accomplishment and the chance to customize flavors just the way you like. Are you ready to create a treat that rivals those iconic store-bought versions? Let’s dive in and discover how to make these irresistible bites!
Why Make Cadbury Creme Bites at Home?
Decadence at Your Fingertips: Enjoy creating rich Cadbury Creme Bites that rival store-bought treats without the preservatives.
Simple and Fun: This straightforward recipe is perfect for bakers of all skill levels, making it a great family activity.
Customizable Flavors: Feel free to experiment with different extracts or chocolate types for a personalized touch, similar to our Creme Brulee French Toast.
Festive Appeal: Ideal for Easter celebrations, these bites are sure to impress guests and are a delightful addition to any gathering.
Treat Yourself: Indulge in gourmet flavors right at home—enjoy it now or store some in the fridge for later (just like our Cheesecake Protein Bites do)!
Cadbury Creme Bites Ingredients
• Get ready to whip up something delicious!
For the Chocolate Shell
- Milk Chocolate – Choose high-quality baking chocolate for the best flavor and texture.
For the Filling
- Light Corn Syrup – Adds sweetness and helps achieve that creamy filling consistency.
- Butter – Use unsalted butter for a rich, creamy base in the filling.
- Vanilla Extract – This enhances the filling’s flavor; consider almond extract for a different twist.
- Powdered Sugar – Essential for sweetening and thickening the filling; no substitutes noted.
- Salt – Balances the sweetness perfectly; don’t skip this ingredient!
- Milk – Adjusts filling consistency; you can use cream for a richer flavor if desired.
- Orange Gel Food Coloring – Adds a vibrant touch to mimic the classic egg yolk; gel works best!
- Yellow Gel Food Coloring – Complements the orange for a yolk-like appearance.
Step‑by‑Step Instructions for Cadbury Creme Bites
Step 1: Prepare the Muffin Cups
Begin by lining 48 mini muffin cups with parchment paper liners for easy removal later. This step is essential as it ensures your homemade Cadbury Creme Bites pop out effortlessly when they set. Make sure the liners are snug and secure, as this will hold the chocolate and filling beautifully.
Step 2: Melt the Chocolate
In a microwave-safe bowl, melt 16 oz of high-quality milk chocolate in 30-second increments, stirring between each cycle. Aim for a smooth, glossy consistency by the end—about 1.5 to 2 minutes in total. Being patient during this melting stage prevents burning, ensuring your chocolate layer will look as luscious as it tastes.
Step 3: Form the Chocolate Base
Once melted, pipe a thin layer of the luscious chocolate into the bottom of each lined muffin cup. Gently tap the muffin tray on the counter to settle the chocolate evenly. Allow these to set at room temperature for about 5–10 minutes or until just firm to the touch, creating a perfect base for your Cadbury Creme Bites.
Step 4: Make the Filling
In a stand mixer, combine softened unsalted butter with light corn syrup on low speed. Then, gradually add milk, vanilla extract, and a pinch of salt, mixing until combined. Slowly incorporate powdered sugar until you reach a thick, creamy filling consistency. This should take about 3–5 minutes, yielding a delightful mixture for your bites.
Step 5: Color the Filling
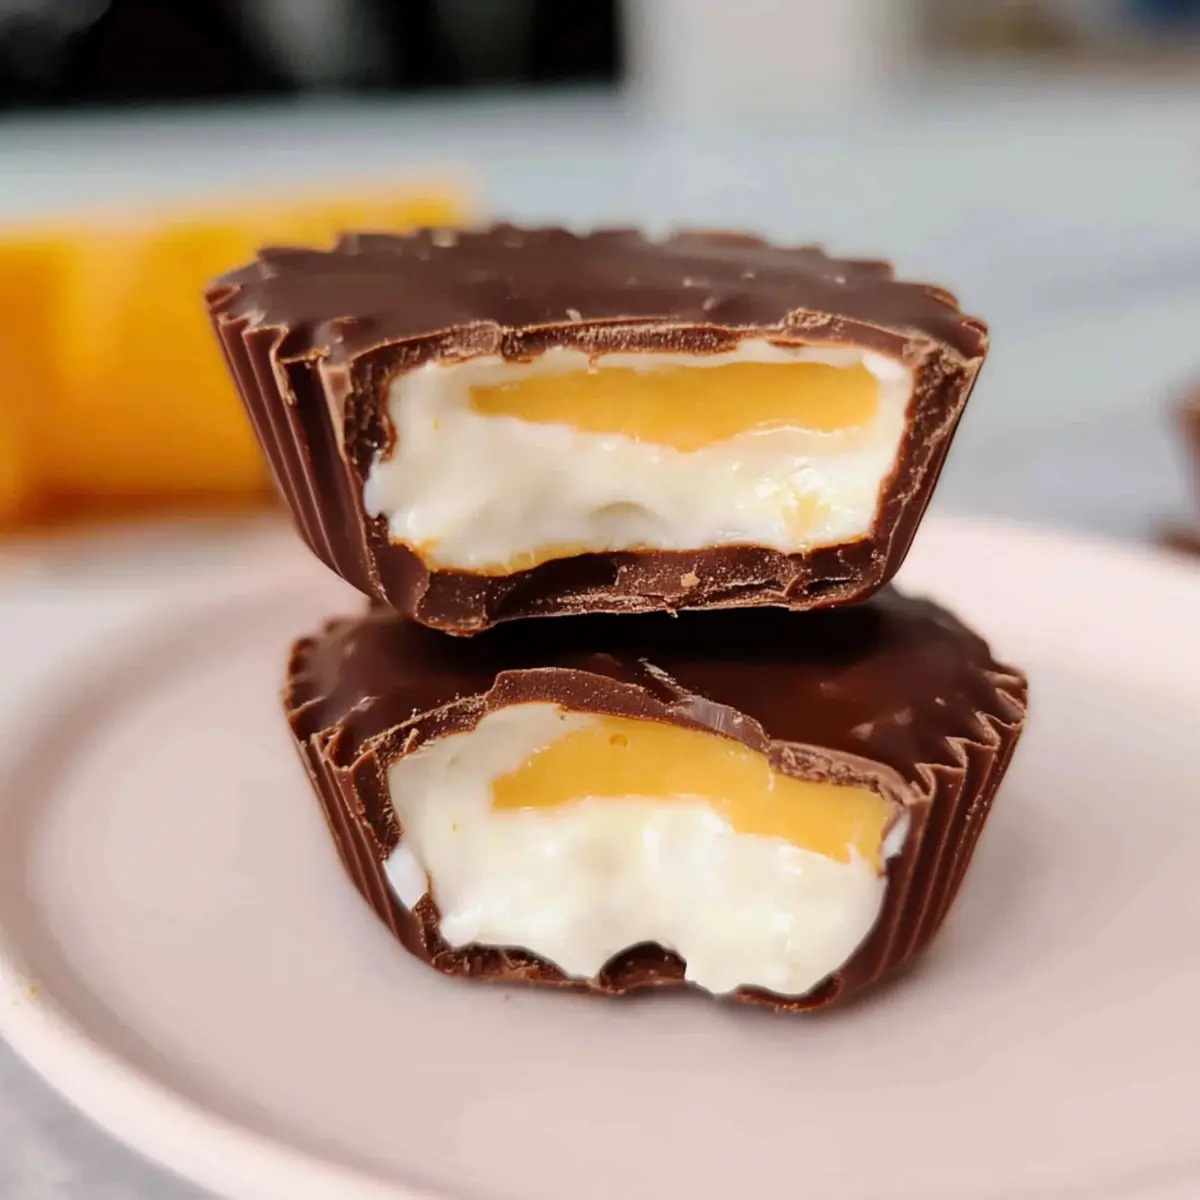
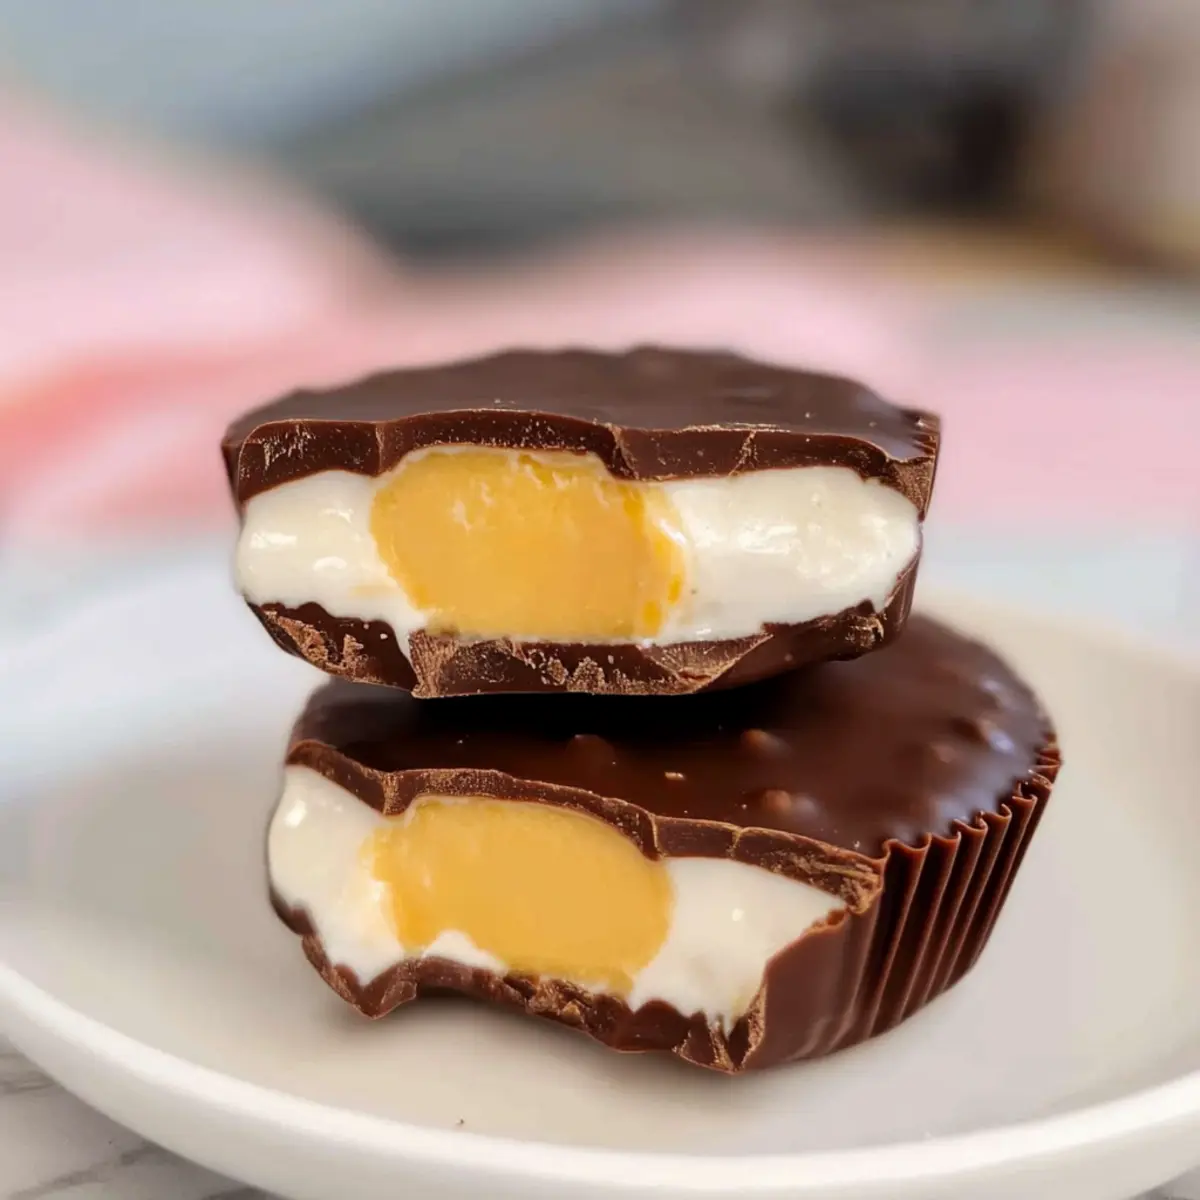
Divide the creamy filling into two portions. Tint one portion with orange gel food coloring to mimic a vibrant yolk, mixing until you achieve your desired shade. Leave the other half white, ensuring you have a striking visual contrast in your Cadbury Creme Bites that mirrors the classic candy.
Step 6: Assemble the Bites
Pipe the white filling over the set chocolate layer in each muffin cup, creating a smooth base layer. Next, add a small dollop of the orange filling right in the center of the white layer. This layering effect brings a delightful surprise and showcases the colorful filling once you take a bite, resembling a Cadbury egg beautifully.
Step 7: Seal with Chocolate
Carefully cover the filled cups with another layer of melted chocolate, making sure to reach the edges. This ensures your Cadbury Creme Bites are fully sealed and gives them a smooth top. Use a spatula to gently smooth out any excess chocolate, creating a flawless finish.
Step 8: Chill to Set
Place the filled and topped muffin tray in the refrigerator for about 30 minutes to allow the chocolate to set completely. You’ll know they are ready when the chocolate is firm and snaps when gently pressed. This chilling step is crucial for achieving that perfect crunch of chocolate when you enjoy your homemade Cadbury Creme Bites.

Cadbury Creme Bites Variations & Substitutions
Customize these delightful Cadbury Creme Bites to match your taste preferences or dietary needs!
- Dairy-Free: Substitute dairy chocolate with a high-quality dairy-free chocolate for a vegan variation.
- Nutty Twist: Add finely chopped nuts to the filling for added texture and flavor. Try pecans or walnuts for a unique crunch!
- Almond Flavor: Swap vanilla extract for almond extract in the filling for a delightful nutty aroma.
- Colorful Filling: Use different gel food colorings beyond orange and yellow, like pink or green, for festive occasions or holidays.
- Rich Chocolate Shell: Experiment with dark chocolate for the outer shell for a deeper, richer taste—perfect for dark chocolate lovers!
- Creamier Filling: For an extra rich filling, replace milk with heavy cream or add cream cheese into the mixture for added creaminess.
- Minty Refresh: Stir in a few drops of peppermint extract to the filling for a refreshing mint version—perfect for holiday gatherings!
- Layered Delight: Add crushed cookies between the layers of chocolate and filling for an added crunch similar to our Sweet Air Bites, creating a delightful surprise with each bite.
Feel free to explore these variations as you create your delicious Cadbury Creme Bites. Enjoy the process of making your treats unique!
How to Store and Freeze Cadbury Creme Bites
Fridge: Keep your Cadbury Creme Bites in an airtight container; they will stay fresh for up to 2 weeks. This helps maintain their rich flavor and silky texture.
Freezer: If you want to enjoy them later, freeze the bites in a single layer on a baking sheet before transferring to a sealed container. They’re good for up to 3 months, but note that freezing may alter the texture slightly.
Reheating: When ready to enjoy frozen bites, simply thaw them in the fridge overnight to retain their creamy filling consistency. Avoid microwaving them, as it can cause the chocolate to become soft or melt.
Make Ahead Options
Preparing your delectable Cadbury Creme Bites in advance is a fantastic way to save time, especially during the busy Easter season! You can prepare the chocolate shell and the creamy filling up to 24 hours ahead of time. Simply melt the chocolate and pipe it into the muffin cups, allowing it to set. The filling can be made, tinted, and stored covered in the refrigerator—this way, the flavors meld beautifully. Just before serving, pipe the filling into the chocolate bases and seal them with a final layer of chocolate. This ensures your homemade Cadbury Creme Bites stay as delicious and fresh as if made on the same day!
Expert Tips for Cadbury Creme Bites
- Choose Quality Chocolate: Use high-quality milk chocolate to ensure a rich flavor and smooth texture; cheap chocolate won’t give the same indulgent taste.
- Melt Carefully: Avoid burning your chocolate by melting in short 30-second bursts, stirring well between each. This patience pays off!
- Cool Before Filling: Make sure your chocolate base is completely cooled before adding filling; this prevents a melt and keeps the layers distinct and appealing.
- Even Distribution: When piping the fillings, be sure to distribute them evenly to maintain the classic look of Cadbury Creme Bites and achieve a delightful bite each time.
- Chill Properly: Be patient and allow your treats to chill for at least 30 minutes before serving; this ensures the chocolate shell sets perfectly for a satisfying crunch.
What to Serve with Homemade Cadbury Creme Bites
Imagine creating a delightful celebration of flavors and textures that complements these sweet, chocolatey bites perfectly!
- Coffee or Espresso: A rich cup of coffee balances the sweetness and enhances the chocolate’s depth, making each bite even more satisfying.
- Fresh Berries: Bright and tangy strawberries or raspberries add a refreshing contrast, cleansing the palate between indulgent bites.
- Vanilla Ice Cream: Creamy vanilla ice cream provides a cool counterpoint to the rich flavors, offering a delicious melt-in-your-mouth experience.
- Homemade Whipped Cream: Light and fluffy, this is a delightful touch that refreshes the taste buds and makes for a charming presentation.
- Mint Chocolate Chip Cookies: For a fun twist, serve alongside these cookies for layers of flavors with a subtle minty theme. They’ll resonate well with the chocolatey bites!
- Chocolate Milk: Chocolate pairings are always a hit! This treat will indulge any chocoholic craving with its creamy sweetness.
- Sparkling Water with Lemon: For a lighter touch, sparkling water brightens the flavors and refreshes the palate beautifully, balancing out the sweetness of the bites.
- Peanut Butter Cup Brownies: A full-on chocolate extravaganza! The richness of these brownies will complement the creamy filling of your Cadbury Creme Bites.
- Caramel Sauce: Drizzle over your bites or serve for dipping, adding a rich, buttery sweetness that harmonizes wonderfully with the chocolate.
Cadbury Creme Bites Recipe FAQs
How do I choose the best milk chocolate for my Cadbury Creme Bites?
Absolutely! For the best flavor, I recommend opting for high-quality baking chocolate, which typically has a higher cocoa content and fewer additives. Look for brands that don’t contain artificial flavors or waxes for that authentic rich taste.
What’s the best way to store leftover Cadbury Creme Bites?
You can keep your Cadbury Creme Bites fresh by storing them in an airtight container in the refrigerator. They’ll remain delightful for up to two weeks. This helps preserve their creamy filling and smooth chocolate shell, making them perfect to enjoy whenever your sweet tooth calls!
Can I freeze Cadbury Creme Bites for later?
Yes, you can! To freeze your Cadbury Creme Bites, first, place them in a single layer on a baking sheet and freeze for about 1-2 hours until solid. Then, transfer them to a sealed container or freezer bag, making sure to label it with the date. They can be frozen for up to 3 months. When you’re ready to indulge, thaw them in the fridge overnight to keep that creamy texture intact.
What should I do if my chocolate doesn’t melt smoothly?
Very! If your chocolate is clumpy or grainy, it’s likely overheated. I recommend bringing it back together by carefully adding a teaspoon of vegetable oil or coconut oil while stirring. Melt in shorter intervals, allowing the chocolate to cool slightly between each burst to achieve a smooth consistency.
Are there any allergens I should be aware of when making Cadbury Creme Bites?
Certainly, it’s important! This recipe contains common allergens like milk and soy found in milk chocolate. If you’re making these for someone with allergies or dietary restrictions, consider using dairy-free chocolate and adjusting the filling ingredients accordingly. Always check labels for allergens, especially if you’re making this for young children or pets.

Decadent Cadbury Creme Bites You Can Make at Home
Ingredients
Equipment
Method
- Line 48 mini muffin cups with parchment paper liners.
- Melt the milk chocolate in a microwave-safe bowl in 30-second increments until smooth.
- Pipe a thin layer of melted chocolate into the bottom of each lined muffin cup and let set at room temperature.
- In a stand mixer, mix unsalted butter with light corn syrup, then gradually add milk, vanilla extract, and salt. Mix until combined.
- Incorporate powdered sugar until thick and creamy, about 3-5 minutes.
- Divide the filling and tint one half with orange gel food coloring and leave the other half white.
- Pipe the white filling into the cups over the chocolate base, then add a dollop of orange filling on top.
- Seal with another layer of melted chocolate, smoothing the top.
- Refrigerate for 30 minutes to allow the chocolate to set completely.
Leave a Reply