
In the whirl of a busy weeknight, realizing you have just a can of tuna in the pantry could easily lead to a mini crisis. But fear not! I’ve transformed that unassuming can into crispy baked canned tuna fish sticks that are not only a hit with the kids but also a joy to make. These delightful bites are a quick, budget-friendly meal option that promises to put smiles around the dinner table, without the stress of complicated prep. You can whip them up in no time and even prep ahead for those evenings when you’re juggling life. So, are you ready to elevate your canned tuna game and discover your new favorite dish?
Why are these tuna sticks unbeatable?
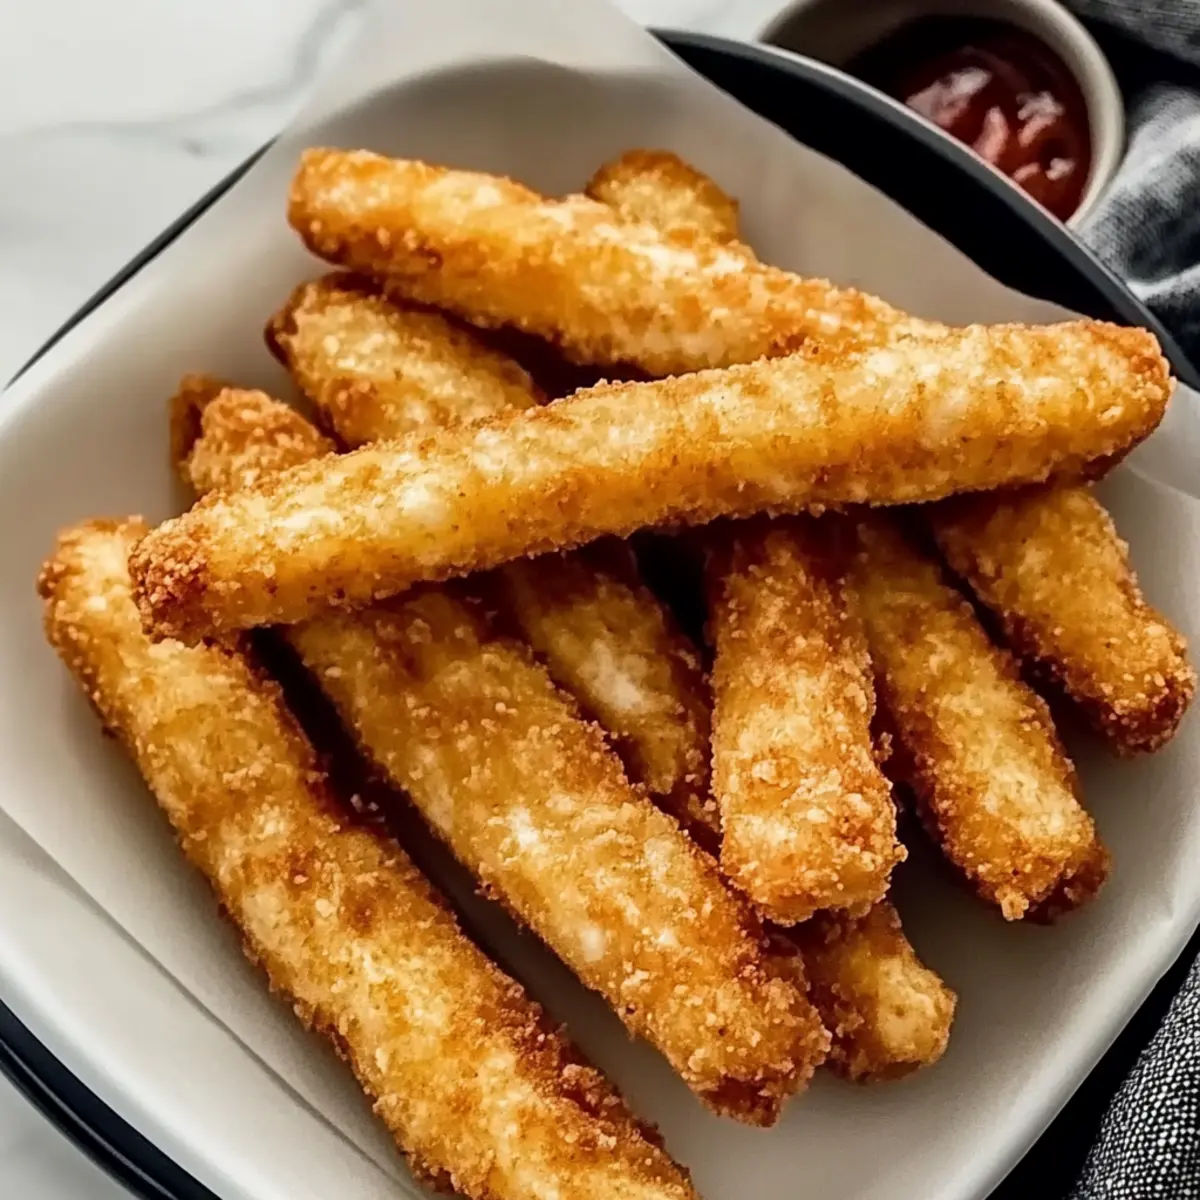
Kid-friendly and budget-conscious: These baked canned tuna fish sticks turn a humble pantry staple into a fun, nutritious meal that both children and adults will love.
Crispy perfection: Enjoy the satisfying crunch from the outside while the cheesy, tender interior delights your taste buds.
Quick and simple: Ready in just 30 minutes, they save you time on busy nights, making dinner a breeze.
Versatile flavors: Customize with your choice of spices or dipping sauces, making each meal uniquely yours. Perfect for dipping in ranch or spicy mayo!
Prep ahead: Make them in advance, refrigerate or freeze, and reheat easily for a homemade meal anytime. Discover how to elevate your weeknight dinners with other fun ideas like Fryer Mozzarella Sticks or Baked Eggs Napoleon for a true culinary adventure!
Baked Canned Tuna Fish Sticks Ingredients
Prepare to make something special with these easy and affordable baked canned tuna fish sticks!
For the Fish Sticks
- Canned Tuna – Use tuna packed in water for optimal flavor and texture; drain thoroughly to avoid sogginess.
- Shredded Cheddar Cheese – This ingredient adds richness and acts as a binder; feel free to substitute with mozzarella or pepper jack if you prefer.
- Egg – Essential for holding the sticks together; don’t skip this crucial ingredient!
- Seasonings (salt, pepper, etc.) – Enhance the flavor with customized spices; consider adding garlic powder or paprika for a delightful kick.
- Crushed Pork Rinds – Provides a crispy coating; you can swap them out for crushed potato chips or breadcrumbs for a different texture.
These ingredients will turn your pantry staples into deliciously crispy baked canned tuna fish sticks!
Step‑by‑Step Instructions for Baked Canned Tuna Fish Sticks
Step 1: Preheat the Oven
Begin by preheating your oven to 400°F (200°C). This temperature will ensure that your baked canned tuna fish sticks become golden and crispy. While the oven is warming up, gather your ingredients and prep your baking sheet with parchment paper, setting the stage for your tasty treat.
Step 2: Mix the Ingredients
In a large mixing bowl, combine the thoroughly drained canned tuna, shredded cheddar cheese, and one beaten egg. Sprinkle in your chosen seasonings—consider salt, pepper, garlic powder, or paprika—for an extra pop of flavor. Use a fork to mash and mix the ingredients together until they are well blended, creating a chunky and cohesive mixture.
Step 3: Shape the Fish Sticks
Using your hands, take portions of the tuna mixture and shape them into sticks, about the size of traditional fish sticks. Aim for uniformity in size to ensure even cooking. Lay each formed stick on a clean plate, adding them one by one. This step will result in beautifully crispy baked canned tuna fish sticks with a delightful texture.
Step 4: Prepare the Coating
In a shallow dish, spread out your crushed pork rinds (or your chosen substitute like potato chips). Roll each shaped fish stick in the coating, pressing slightly to adhere, ensuring all sides are covered well. This step is crucial for achieving that golden crunch on the outside of the baked canned tuna fish sticks.
Step 5: Arrange on Baking Sheet
Carefully place the coated fish sticks on your prepared parchment-lined baking sheet, leaving space between each stick for proper airflow. This will help them crisp up nicely as they bake. Make sure they are well spaced out to prevent any steaming while baking, ensuring a perfect crispy finish on all sides.
Step 6: Bake Until Golden
Transfer the baking sheet to your preheated oven and bake the tuna fish sticks for about 20 minutes. Keep an eye on them; they should turn golden brown and feel firm to the touch when they’re ready. The aroma wafting from the oven will let you know they’re getting close to that perfect crispy texture.
Step 7: Cool and Serve
Once baked, remove the fish sticks from the oven and allow them to cool slightly on the baking sheet. This resting time helps them firm up a bit more. Serve your delicious baked canned tuna fish sticks with a variety of dipping sauces, such as ranch or spicy mayo, for an extra burst of flavor and enjoyment.

Helpful Tricks for Baked Canned Tuna Fish Sticks
- Well-Drained Tuna: Make sure to drain your canned tuna thoroughly to avoid soggy fish sticks. Patting it dry with a paper towel can help improve texture.
- Chill Before Shaping: Rest the mixture in the refrigerator for at least 15 minutes before shaping, enhancing the sticks’ consistency and making them easier to form.
- Even Size Matters: Shape your fish sticks into uniform sizes to ensure even cooking; this prevents some sticks from being overdone while others remain undercooked.
- Spacing is Key: Place the sticks apart on the baking sheet to allow proper airflow; overcrowding can lead to steaming, which affects crispiness.
- Crispiness Reinforcement: If you want extra crunch, consider double-coating your fish sticks by dipping them in beaten egg again after the first coating and then re-rolling in crushed pork rinds.
These tips will help you create perfect baked canned tuna fish sticks that are both delicious and satisfying!
Make Ahead Options
These crispy baked canned tuna fish sticks are a fantastic option for meal prep! You can mix the tuna, cheese, egg, and seasonings up to 24 hours in advance. Simply store the mixture in an airtight container in the refrigerator, covering it tightly to maintain freshness. When you’re ready to enjoy your fish sticks, shape the mixture into sticks, coat them, and bake them according to the original instructions. If you prefer to prepare even further ahead, you can freeze the formed, uncooked sticks in a single layer for up to 2 months. Just ensure to layer the sticks with parchment paper to avoid sticking. When it’s time for dinner, bake them straight from the freezer, adding a few extra minutes to the cooking time. Enjoy the convenience of delicious homemade fish sticks without the hassle on busy nights!
Baked Canned Tuna Fish Sticks Variations
Get ready to unleash your creativity with these delicious ways to customize your baked canned tuna fish sticks!
-
Dairy-Free: Substitute cheese with nutritional yeast for a cheesy flavor without dairy. It adds a delightful umami boost!
-
Spicy Twist: Add cayenne pepper or diced jalapeños to your mixture for an extra kick! This brings liveliness to every bite while keeping it kid-friendly.
-
Veggie-Loaded: Incorporate finely chopped spinach or zucchini into the tuna mix for added nutrition. The moisture enhances flavor while offering a delicious surprise.
-
Zesty Citrus: Mix in a splash of lemon or lime juice before shaping the sticks. This brightens up the flavors and elevates the overall taste.
-
Herb Infusion: Experiment with fresh or dried herbs, such as dill or parsley, for a fresh flavor profile. It complements the tuna beautifully, adding a touch of garden freshness.
-
Texture Variation: Substitute pork rinds with crushed cornflakes for a gluten-free option. This gives a crunchy, delightful twist while keeping the preparation simple.
-
Teriyaki Fusion: Incorporate teriyaki sauce into the mixture and serve with an Asian-inspired dipping sauce. This unexpected combination will wow your taste buds!
-
Tuna Alternatives: Swap canned tuna for canned salmon or sardines to explore new flavors. This adds variety while still being budget-friendly!
Feel free to mix and match these ideas, and consider serving them up with delicious sauces like ranch or spicy mayo. And if you’re looking for more inspiration, check out these amazing Baked Eggs Napoleon or try your hand at creating crispy Fryer Mozzarella Sticks for an engaging family dinner!
How to Store and Freeze Baked Canned Tuna Fish Sticks
Fridge: Store leftover baked canned tuna fish sticks in an airtight container in the fridge for up to 3 days. Place a paper towel inside to help maintain their crispness.
Freezer: For long-term storage, freeze the fish sticks in a single layer on a baking sheet. Once frozen, transfer them to a freezer-safe container with parchment paper between layers to prevent sticking. They can be stored for up to 2 months.
Reheating: To enjoy leftover fish sticks again, reheat them in an air fryer at 350°F for 3-4 minutes or bake at 375°F for 5-7 minutes until crispy.
Make-Ahead: You can prep the mixture ahead of time and store it covered in the refrigerator for up to 24 hours before shaping and baking.
What to Serve with Crispy Baked Tuna Fish Sticks
Elevate your meal experience with delightful sides that complement the deliciously crispy tuna fish sticks and make everyone’s taste buds dance.
-
Creamy Coleslaw: A cool and crunchy slaw adds freshness and a creamy contrast to the savory fish sticks, perfect for balancing flavors.
-
Sweet Potato Fries: Offering sweetness and a soft inside, these fries pair beautifully with the fish sticks, giving a delightful textural contrast.
-
Garlic Bread: Buttery, crispy garlic bread serves as a wonderful vehicle for any leftover dipping sauce you might have, tying the meal together.
-
Crisp Garden Salad: A fresh mix of greens, cucumber, and tomatoes brightens the plate and provides a refreshing crunch, lightening up the hearty tuna sticks.
-
Tartar Sauce: A classic pairing, this tangy sauce enhances the fishy flavor profile and adds a zesty kick that everyone will love.
-
Classic Macaroni and Cheese: The creamy indulgence of mac and cheese creates a comforting, family-friendly atmosphere that complements the crispy texture of the tuna sticks.
-
Lemonade: This refreshing drink adds a bright, citrusy note that enhances all the delicious flavors on your plate while keeping things light.
-
Chocolate Chip Cookies: End your meal on a sweet note with warm cookies, offering a delicious contrast to the savory fish sticks and creating moments of pure joy.

Baked Canned Tuna Fish Sticks Recipe FAQs
What type of canned tuna should I use?
I recommend using tuna packed in water for the best flavor and texture. Be sure to drain it thoroughly to avoid soggy fish sticks—nobody wants that!
How should I store leftovers, and how long do they last?
Leftover baked canned tuna fish sticks can be stored in an airtight container in the fridge for up to 3 days. To keep them crispy, place a paper towel inside the container—this absorbs excess moisture.
Can I freeze these fish sticks, and how?
Absolutely! To freeze, place the cooked fish sticks in a single layer on a baking sheet and freeze until solid. Then, transfer them to a freezer-safe container, placing parchment paper between layers to prevent sticking. They can be stored for up to 2 months.
What if my fish sticks turn out soggy? What should I do?
If you find your tuna fish sticks soggy, it often comes from not draining the tuna adequately or overcrowding the baking sheet, which traps moisture. To fix this in the future, make sure to drain the tuna thoroughly and keep the sticks spaced apart. Additionally, make sure to bake on a parchment-lined sheet to aid in crispiness.
Can I make these fish sticks gluten-free?
Yes! You can easily make these baked canned tuna fish sticks gluten-free by substituting the crushed pork rinds with gluten-free breadcrumbs or crushed gluten-free potato chips for that same delightful crunch.
Are these safe for kids with allergies?
While the main ingredients are generally safe, please check for individual allergy triggers like eggs or dairy. For a kid-friendly version, consider replacing the cheese with a dairy-free alternative or omitting it altogether.

Crispy Baked Canned Tuna Fish Sticks for Quick Family Dinners
Ingredients
Equipment
Method
- Preheat your oven to 400°F (200°C) and prepare your baking sheet with parchment paper.
- In a large mixing bowl, combine drained canned tuna, shredded cheese, and beaten egg. Add seasonings and mix until well blended.
- Shape the mixture into sticks, similar in size to traditional fish sticks.
- Spread crushed pork rinds in a shallow dish and roll each stick in the coating, ensuring all sides are covered.
- Arrange the coated sticks on the baking sheet, leaving space for airflow.
- Bake for about 20 minutes or until golden brown and firm to the touch.
- Allow to cool slightly before serving with dipping sauces.
Leave a Reply