
As the sun starts to shine a little brighter and flowers peek through the thawing ground, I get a sudden craving for a dessert that captures the essence of spring. Enter the stunning Easter Poke Cake—a delightful twist on traditional cakes that brings together fluffy cake, rich pudding, and a playful splash of color. This easy-to-make treat not only dazzles with its vibrant layers but also makes for a kid-friendly crowd-pleaser at your holiday gatherings. Whether you’re new to baking or a seasoned home chef, you’ll appreciate how effortlessly customizable this recipe is. With flavor variations such as lemon or pistachio, plus an array of topping options, it’s truly a canvas for your creativity. Ready to impress your guests? Let’s dive into this charming recipe together!

Why Is Easter Poke Cake So Special?
Kid-friendly Fun: This cake is not only a feast for the eyes but also for little taste buds, making it perfect for kids and adults alike.
Easy to Make: With the use of boxed cake mix, even novice bakers can whip this up in no time.
Endless Variations: Whether you prefer lemon pudding for a tangy twist or a rich pistachio flavor, you can easily customize it to fit your taste.
Crowd-Pleasing Delight: Perfect for any holiday gathering, this vibrant cake is sure to impress! Don’t forget to try it out with a scoop of ice cream or fresh fruit for extra indulgence.
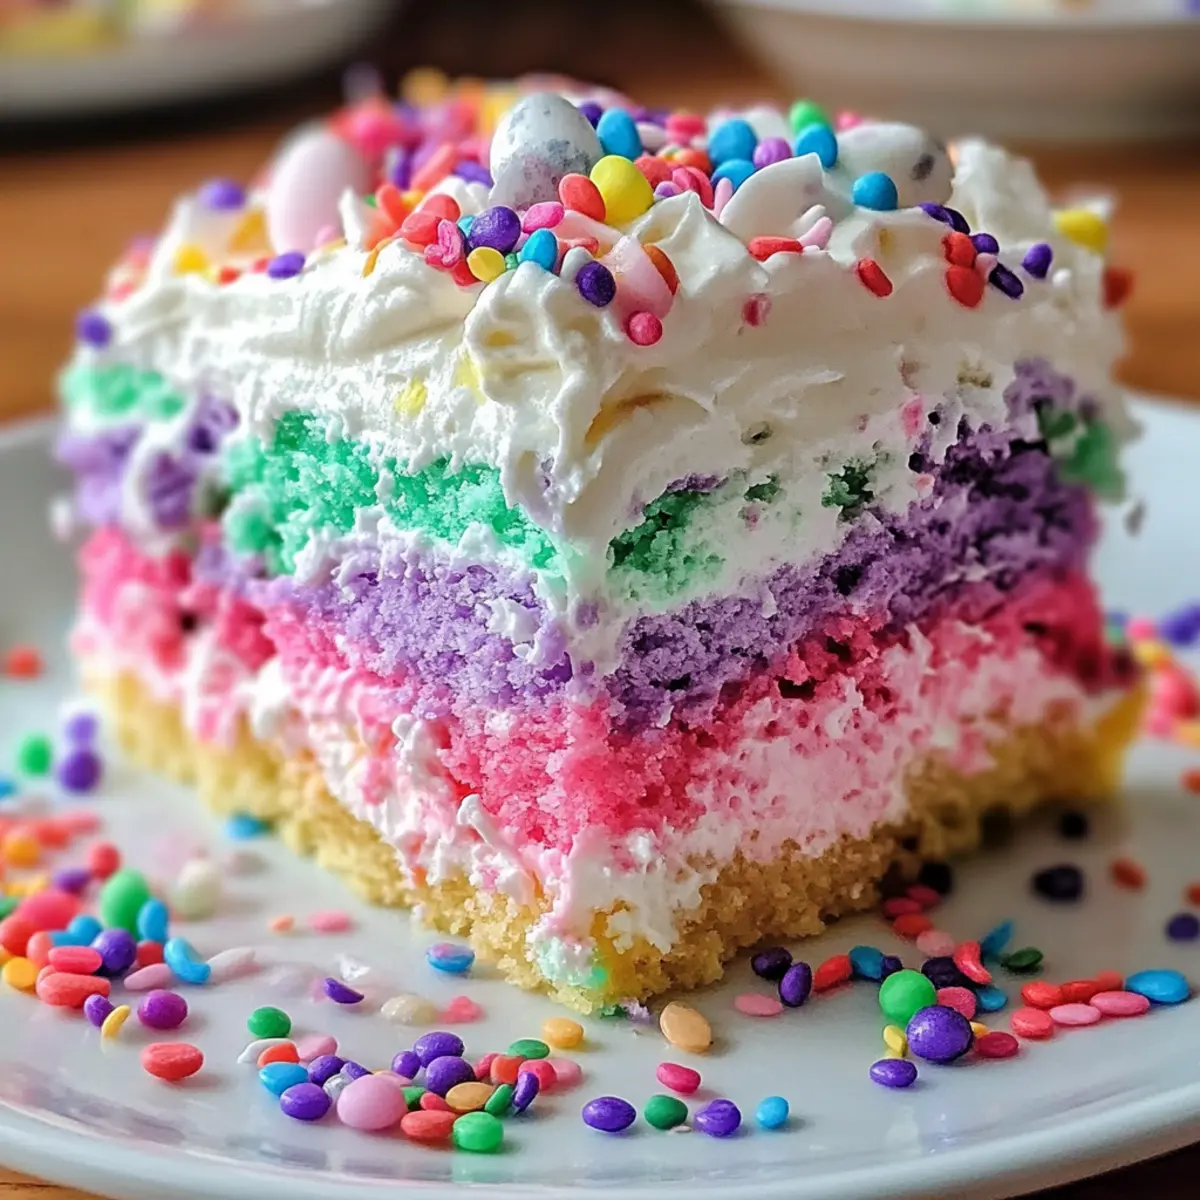
Visual Appeal: The bright colors and playful toppings make this cake a showstopper that adds charm to your Easter table, leaving everyone eager for a slice!
Easter Poke Cake Ingredients
For the Cake
• Boxed White Cake Mix – Serves as the base of your Easter Poke Cake, providing delicious structure.
• Eggs – Follow package instructions for the exact number, ensuring the cake rises beautifully.
• Oil – Adds moisture and richness; refer to the boxed mix’s guidelines for the right amount.
• Water – Essential for mixing; check your cake mix for the required quantity.
For the Colorful Layers
• Gel Food Coloring – Creates vibrant pastel shades to bring your cake to life; use soft colors like pink, green, and blue.
For the Creamy Filling
• Instant Vanilla Pudding (2 boxes) – Offers creaminess; swap for flavors like lemon or pistachio for tasty variations!
• Cold Milk (4 cups) – Vital for preparing the pudding; make sure it’s chilled to achieve the right consistency.
For the Topping
• Cool Whip – Light and fluffy, this adds a sweet finishing touch; you can tint it for added color.
• Easter Sprinkles/Berries/Candy Eggs – Optional decorative elements that enhance the cake’s festive look and feel.
Feel free to mix and match flavors to surprise your family and friends with this cheerful Easter Poke Cake!
Step‑by‑Step Instructions for Easter Poke Cake
Step 1: Preheat and Prepare the Oven
Begin by preheating your oven to 350°F (175°C). While it’s warming up, grab a 9×13-inch baking pan and grease it lightly with cooking spray or line it with parchment paper. This will ensure that your Easter Poke Cake releases easily once baked, allowing for a beautiful presentation to your festive table.
Step 2: Mix the Cake Batter
In a large mixing bowl, prepare the boxed white cake mix according to the package instructions. This usually includes adding eggs, oil, and water. Once combined, divide the batter evenly among 3-4 smaller bowls to create your colorful layers, ensuring each section is mixed and ready for the fun part.
Step 3: Color the Batter
Add a few drops of gel food coloring to each bowl of cake batter, choosing soft pastel shades like pink, green, blue, and lavender to evoke the spirit of spring. Gently fold in the coloring, being careful not to overmix and losing those beautiful hues. This step will give your Easter Poke Cake its vibrant and eye-catching layers.
Step 4: Create a Colorful Swirl
Spoon the different colored batters alternately into your prepared pan. Once you’ve added all the colors, take a butter knife and gently swirl through the batter to create a marbled effect. Aim for an even mix of colors that will bake beautifully, adding a playful touch to each slice of your cake.
Step 5: Bake the Cake
Place the pan in your preheated oven and bake for 28-32 minutes, or until a toothpick inserted into the center comes out clean. Keep an eye on it as it bakes, and enjoy the delightful aroma wafting through your kitchen. Once done, remove the cake from the oven and let it cool for about 15–20 minutes.
Step 6: Poke Holes in the Cake
After your cake has cooled slightly, take a wooden spoon handle and carefully poke holes every inch or so across the surface. Make sure not to poke all the way to the bottom, as this will allow your pudding filling to soak in perfectly without making the cake soggy. Your Easter Poke Cake is now ready for the creamy filling!
Step 7: Prepare the Pudding Mix
In a mixing bowl, whisk together the two boxes of instant vanilla pudding with the 4 cups of cold milk until the mixture is thick and smooth. This step is crucial; it should be pourable but thick enough to carefully fill the holes in the cake. The creamy pudding adds moisture and flavor that truly makes this dessert special.
Step 8: Pour the Pudding Over the Cake
Once your pudding is ready, slowly pour it over the cooled cake, ensuring that it seeps into all those lovely holes you’ve created. Spread it evenly across the top with a spatula if necessary. This will allow the pudding to create a decadent filling, enhancing the delightful texture of your Easter Poke Cake.
Step 9: Chill the Cake
Cover the cake with plastic wrap and pop it into the refrigerator for at least 2 hours, although letting it sit overnight is ideal. This chilling process helps the cake absorb the pudding flavor deeply, ensuring that you get that moist, delicious layer with every bite.
Step 10: Top with Cool Whip
After chilling, remove your Easter Poke Cake from the refrigerator. Spread a generous layer of Cool Whip over the top, creating a light and fluffy topping. If you’d like, you can also tint the Cool Whip with a bit more gel food coloring for added whimsy—just a few drops will do to keep things cheerful.
Step 11: Decorate the Cake
Now comes the fun part! Decorate the top of your Easter Poke Cake with festive touches like sprinkles, fresh berries, or even candy eggs for a playful finish. These colorful decorations will not only enhance the presentation but bring the spirit of Easter right to your table.
Step 12: Slice and Serve
When you’re ready to serve, slice the cake into squares and enjoy it chilled. The vibrant colors and creamy layers will make this dessert the star of your gathering. Pair each slice with a scoop of ice cream or some fresh fruit for an extra indulgent treat that everyone will love!

Expert Tips for Easter Poke Cake
-
Pudding Consistency: Ensure your pudding mix is thick yet pourable before applying it to the cake. This helps achieve the perfect soaking effect, enhancing the flavor of the Easter Poke Cake.
-
Refrigeration Time: Allow the cake to chill for at least 2 hours, or overnight for best results. This crucial step ensures the pudding penetrates the cake, making it incredibly moist.
-
Hole Poking Technique: Avoid pushing the wooden spoon all the way through the cake when poking holes. This minimizes sogginess while maximizing pudding absorption, resulting in a delightful texture.
-
Creative Toppings: Get creative with Cool Whip toppings! Tint it with food coloring and add sprinkles, fresh fruit, or candy to visually enhance your Easter Poke Cake and make it more festive.
-
Flavor Variations: Don’t hesitate to explore different pudding flavors like lemon or pistachio for a unique twist. This customization will keep your dessert exciting for every gathering!
Easter Poke Cake Variations & Substitutions
Customize your Easter Poke Cake to suit your taste buds and create memorable flavor combinations!
-
Fruit-Infused: Add fresh fruit puree to the pudding mix for a luscious flavor. Strawberries or raspberries provide delightful freshness.
-
Lemon Pudding Twist: Substitute vanilla pudding with lemon pudding for a zesty kick that pairs beautifully with the cake’s sweetness.
-
Nutty Pistachio Delight: Use pistachio pudding instead of vanilla for a rich, nutty flavor that will surprise and delight your guests.
-
Cream Cheese Frosting: Swap Cool Whip for cream cheese frosting, adding depth and a tangy richness that’s simply irresistible.
-
Coconut Cream Variation: Replace milk with coconut milk and use coconut pudding mix for a tropical flair that transports you to sunny beaches.
-
Chocolatey Indulgence: Use chocolate pudding to create a decadent chocolate Easter Poke Cake. Top with chocolate shavings for an impressive finish!
-
Spicy Ginger Kick: Add a teaspoon of ground ginger or cinnamon to the cake batter for a warm, spiced flavor that’s perfect for festive gatherings.
-
Sassy Heat: For those who enjoy a spicy note, add a pinch of cayenne pepper to the pudding mixture for a surprising kick that complements the sweetness of the cake.
Feel free to combine ideas, and don’t hesitate to experiment with toppings, like those colorful Easter sprinkles or a drizzle of chocolate! If you’re looking for more inspiration, try out the delightful Blueberry Cheesecake Protein or the charming Angel Cake Churro for more fun twist ideas in your kitchen!
Storage Tips for Easter Poke Cake
Fridge: Store your Easter Poke Cake in the refrigerator, covered with plastic wrap or in an airtight container, for up to 3 days to maintain its moisture and freshness.
Freezer: You can freeze the cake for longer storage—up to 2 months. Wrap it tightly in plastic wrap and then in aluminum foil to prevent freezer burn.
Thawing: When ready to enjoy, thaw the cake overnight in the refrigerator before serving. This ensures that it retains its creamy texture and flavors.
Serving Suggestion: Serve chilled slices directly from the fridge or allow them to sit at room temperature for about 15 minutes for enhanced flavor with each bite.
Make Ahead Options
These vibrant Easter Poke Cakes are perfect for busy home cooks looking to save time! You can prepare the cake base up to 24 hours in advance, allowing you to simply wrap it tightly in plastic wrap and refrigerate. The pudding filling can also be combined and poured over the cake a day ahead for maximum flavor infusion; just make sure to cover it well to keep it from drying out. Then, on the day you plan to serve, apply the Cool Whip topping and decorate with your favorite festive sprinkles or fruit. This way, you’ll have a stunning dessert ready to impress with minimal effort on the big day!
What to Serve with Easter Poke Cake
As you prepare to delight your guests with this vibrant dessert, consider these tasty companions that enhance the festive experience.
-
Fresh Fruit Salad: A colorful medley of seasonal fruits adds a refreshing touch, balancing the cake’s sweetness.
-
Vanilla Ice Cream: The creamy, rich flavor of ice cream pairs wonderfully with the moist cake, creating a delicious contrast in texture.
-
Lemonade or Citrus Punch: Quench thirst with a zesty beverage that complements the springtime flavors of the cake, enhancing the festive mood.
-
Chocolate-Covered Strawberries: These sweet, decadent treats offer a romantic touch, perfect for adding some flair to your dessert table.
-
Mini Cheesecakes: These bite-sized delights create a wonderful variety and appeal to guests of all ages, providing rich flavors alongside your cake.
-
Coffee or Tea: A warm cup serves as a perfect ending to your meal, its bitterness balancing the cake’s sweetness while inviting cozy conversations.
Each of these pairings enhances the charming essence of your Easter Poke Cake, making your gathering truly memorable.
Easter Poke Cake Recipe FAQs
What type of eggs should I use for the cake?
Absolutely! For the best results, use large eggs as specified in your boxed white cake mix instructions. They provide the necessary moisture and structure for your Easter Poke Cake, ensuring it rises beautifully and has a fluffy texture.
How should I store the Easter Poke Cake?
To keep your Easter Poke Cake fresh, store it in the refrigerator, covered with plastic wrap or in an airtight container, for up to 3 days. This will help maintain its moisture and prevent any fridge odors from affecting the cake.
Can I freeze the Easter Poke Cake?
Yes! You can freeze your cake for longer storage—up to 2 months. Just wrap it tightly in plastic wrap, followed by a layer of aluminum foil to prevent freezer burn. When you’re ready to enjoy it, allow it to thaw overnight in the refrigerator for the best texture and flavor.
What should I do if the pudding mixture doesn’t thicken?
If your pudding doesn’t thicken as expected, make sure you’ve used cold milk and whisked it well for the full time indicated on the packaging. If it still seems too runny, try refrigerating it for 10-15 minutes to help it set up. If all else fails, whisk in a bit more pudding mix (1-2 tablespoons) to thicken it.
Is this Easter Poke Cake suitable for people with allergies?
Great question! The Easter Poke Cake contains common allergens like eggs, milk, and wheat. For those with specific dietary restrictions, consider using gluten-free boxed cake mix and alternative milk (like almond or soy) when preparing the pudding. Always double-check labels for cross-contamination if allergies are severe.
How can I customize the flavors of the pudding?
The Easter Poke Cake is wonderfully versatile! Simply substitute the instant vanilla pudding with different flavors like lemon or pistachio for a refreshing twist. Just follow the same steps in the recipe, using the same amount of cold milk as required for your chosen pudding flavor. The more the merrier in this creative baking adventure!

Vibrant Easter Poke Cake: A Rainbow of Flavor and Fun
Ingredients
Equipment
Method
- Preheat your oven to 350°F (175°C) and prepare your 9x13-inch baking pan.
- Mix the boxed white cake mix according to package instructions, adding eggs, oil, and water.
- Divide the batter evenly into 3-4 bowls and add gel food coloring to each for vibrant layers.
- Spoon the different colored batters into the prepared pan and gently swirl using a butter knife.
- Bake for 28-32 minutes until a toothpick inserted comes out clean. Cool for 15-20 minutes.
- Poke holes every inch across the cake surface using a wooden spoon handle.
- In a mixing bowl, whisk together the instant pudding and cold milk until thick and smooth.
- Pour the pudding over the cooled cake, ensuring it seeps into the holes.
- Cover with plastic wrap and refrigerate for at least 2 hours or overnight.
- Spread a layer of Cool Whip over the top and tint with coloring if desired.
- Decorate with sprinkles, fresh berries, or candy eggs before serving.
- Slice and serve chilled, optionally pairing with ice cream or fresh fruit.
Leave a Reply