
As I stood surrounded by the lively chatter and laughter of friends at a backyard BBQ, I felt the warm sunshine on my skin and had an epiphany: the star of the spread was the Cheesy Veg Wrap! These vibrant, customizable wraps are quickly becoming the go-to for 4th of July festivities, melding convenience with flavor and fun. Their ability to cater to all sorts of diets—whether you’re craving a hearty chicken wrap or a fresh vegetarian delight—makes them a prime choice for any table. Plus, they’re an absolute crowd-pleaser that you can whip up in minutes, letting you focus on the festivities rather than the fuss in the kitchen. Curious about how to assemble these colorful bundles of joy for your next picnic or BBQ? Let’s unwrap the magic behind these easy and delicious wraps!

Why Choose Cheesy Veg Wraps?
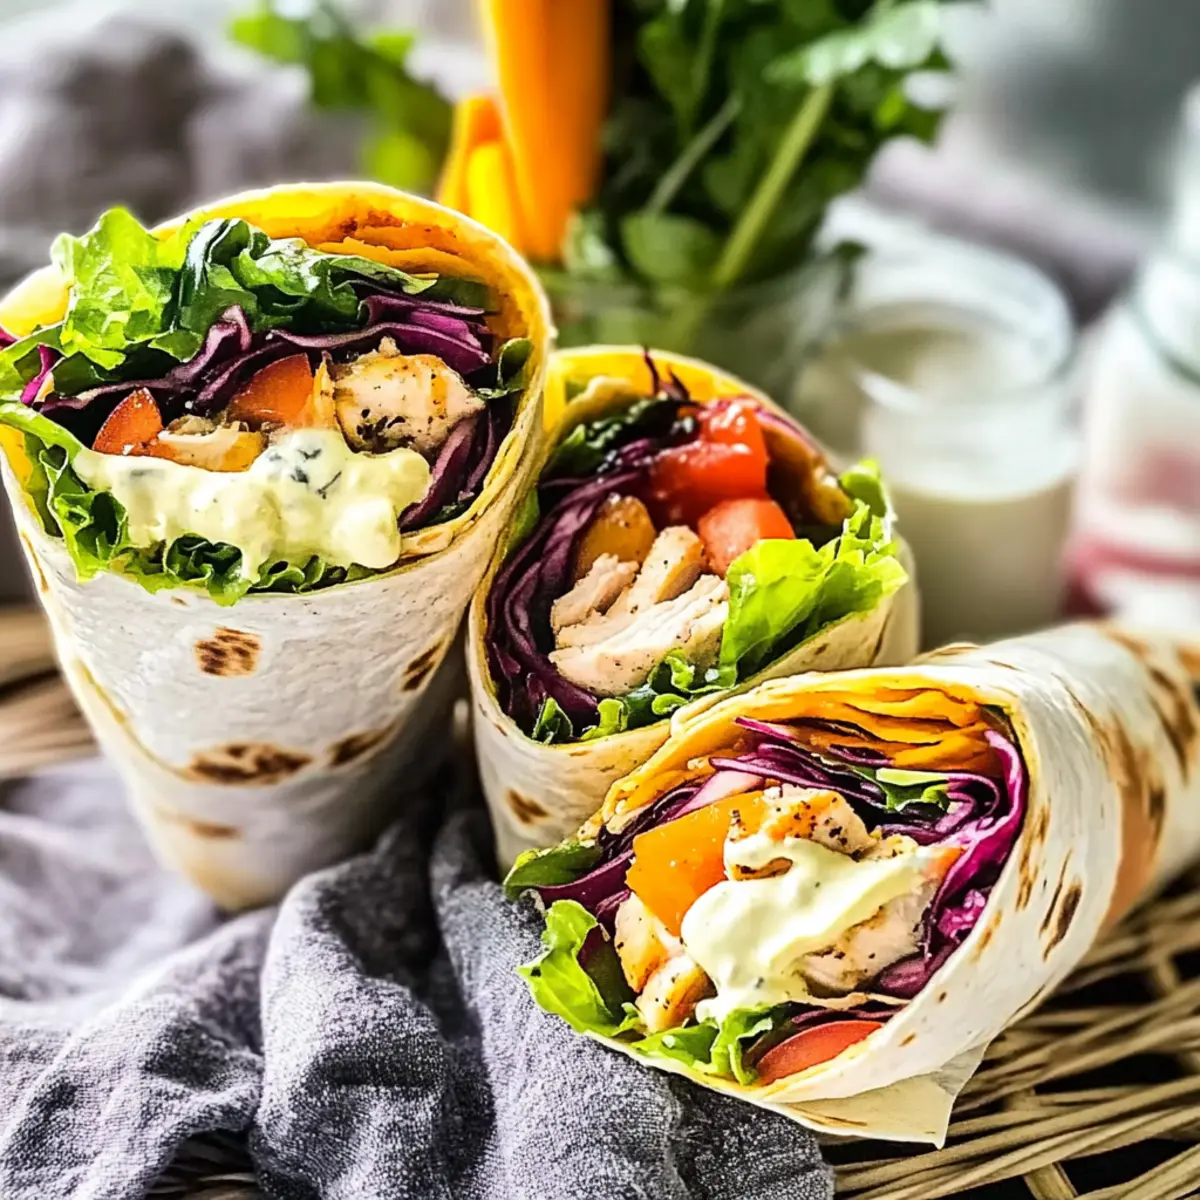
Crowd-Pleaser: These wraps are the life of any party, delighting guests with their vibrant colors and flavors!
Versatile Options: You can easily customize them to fit any dietary preference, from vegetarian to meat lovers.
Quick Assembly: Perfect for last-minute gatherings, you can whip these up in just minutes—saving valuable time!
Colorful Presentation: The vivid combination of fresh veggies and cheese creates an eye-catching dish that’s as appealing as it is delicious.
Mess-Free Enjoyment: With minimal cleanup required, these wraps keep the focus on fun and celebration. Pair them with something like Cheesy Taco Potatoes for an unforgettable feast!
Cheesy Veg Wrap Ingredients
• For those who crave colorful, delicious wraps!
For the Wraps
- Flour Tortillas – these provide a soft and pliable base; consider using whole wheat or spinach for a healthier twist.
- Lettuce Leaves – crisp leaves can serve as a low-carb wrap alternative, perfect for a lighter option!
For the Filling
- Cheese – choose your favorite; cheddar, mozzarella, or pepper jack adds delicious creaminess.
- Mixed Veggies – bell peppers, cucumbers, and shredded carrots bring freshness to the table. Use seasonal veggies to enhance flavor!
- Protein (Optional) – beans or chickpeas for a vegetarian boost, or grilled chicken for those seeking heartier options.
For the Spread
- Creamy Dressing – ranch, hummus, or tzatziki dresses up the wraps with flavor; opt for Greek yogurt if you’re looking for a lighter dressing!
For Extra Flavor
- Fresh Herbs – parsley or cilantro can add a refreshing burst of flavor, perfectly complementing the cheesy veg goodness.
- Spices – sprinkle some smoked paprika or cumin for a warm touch that enhances the overall taste.
These Cheesy Veg Wraps cater to everyone at your picnic or BBQ, providing a delightful experience without the hassle!
Step‑by‑Step Instructions for Cheesy Veg Wrap
Step 1: Prepare the Ingredients
Start by gathering all your ingredients for the Cheesy Veg Wrap. Dice any proteins like grilled chicken or beans, and chop your fresh veggies, such as bell peppers, cucumbers, and shredded carrots. Aim for bite-sized pieces that will roll easily inside the tortilla. This prep will only take about 10 minutes, setting you up for a smooth assembly process.
Step 2: Spread the Dressing
Take your flour tortillas and lay them flat on a clean surface. Using a spatula or the back of a spoon, spread a generous layer of your chosen creamy dressing—be it ranch, hummus, or tzatziki—onto each tortilla. Ensure the dressing is evenly distributed, reaching the edges for maximum flavor in every bite. This step enhances the moisture and taste of your Cheesy Veg Wrap!
Step 3: Layer the Fillings
Now it’s time to build your wrap! On each tortilla, layer a handful of mixed veggies and your preferred cheese. Sprinkle in any optional proteins like beans or grilled chicken if you desire a heartier bite. Make sure to keep the fillings in the center, allowing enough space on the sides for folding. This step should take around 5 minutes.
Step 4: Roll the Wraps
With your fillings in place, gently fold in both sides of the tortilla towards the center. Begin rolling from the bottom up, tucking the fillings inside as you go. Roll tightly but not so much that the contents spill out. By the end of this step, you should have a neat, compact Cheesy Veg Wrap that’s ready for serving or storage.
Step 5: Chill the Wraps (Optional)
For added convenience, wrap each assembled Cheesy Veg Wrap tightly in foil or plastic wrap and refrigerate for up to 6 hours. This chilling time enhances the flavors and also makes them easier to slice later. If serving right away, you can skip this step, but chilled wraps are refreshing and perfect for a hot summer day.
Step 6: Serve and Enjoy
When you’re ready to serve, take each Cheesy Veg Wrap out of the fridge and slice them in half or quarters for easy eating. Arrange them on a platter and feel free to garnish with fresh herbs or spices for an inviting presentation. These colorful wraps pair perfectly with picnic sides like pasta salad, making your gathering a hit!
Expert Tips for Cheesy Veg Wraps
- Don’t Overstuff: Avoid the common mistake of excessive filling; it can lead to messy wraps! Aim for a balanced amount of cheese and veggies.
- Freshness Matters: Use seasonal and fresh vegetables for the best flavor and texture. Revitalize your Cheesy Veg Wraps by choosing whatever is local and in season!
- Wrap It Right: Tightly roll the wraps without squishing the fillings to keep them intact and easy to eat. This helps prevent any unsightly spills!
- Chill for Flavor: Allowing your wraps to chill in the fridge for a few hours enhances the flavors and makes them easy to slice without falling apart.
- Use Barrier Leaves: Lay lettuce leaves under the fillings to help keep the wraps from becoming soggy, especially if adding dressings or juicy veggies.
- Select Proper Spreads: Opt for creamy or zesty spreads; they provide moisture but avoid too much liquid, which can cause sogginess in your Cheesy Veg Wraps.
Cheesy Veg Wrap Variations
Customize your Cheesy Veg Wraps to match your taste buds and dietary needs with these delightful twists!
- Low-Carb Wonder: Swap flour tortillas for lettuce wraps for a fresh, crunchy alternative, perfect for lighter meals.
- Creamy Avocado: Add sliced avocado for an extra layer of creaminess that complements the cheese and veggies beautifully.
- Spicy Kick: Include jalapeños or a drizzle of sriracha for a flavorful heat that’ll awaken your taste buds!
- Nutty Flavor: Stir in some sunflower seeds or sliced almonds for a satisfying crunch and an extra boost of healthy fats.
- Herbal Infusion: Mix fresh herbs like basil or cilantro into the filling for a fragrant and refreshing twist that brightens every bite.
- Zesty Variants: Swap out ranch for a spicy chipotle mayo or zesty vinaigrette to enhance the wrap’s flavor profile.
- Proteins Galore: Toss in grilled chicken, turkey, or even chickpeas to cater to protein lovers while adding depth to your wraps.
- Flavorful Sauces: Experiment with unique sauces like pesto or a homemade barbecue sauce for an unexpected flavor adventure.
Feel free to mix and match these ideas to create your perfect wrap! Pair them with tasty sides like Cheesy Garlic Cruffin or Teriyaki Chicken Wrap to elevate your BBQ spread even more.
How to Store and Freeze Cheesy Veg Wraps
Fridge: Place wrapped Cheesy Veg Wraps in an airtight container and store in the fridge for up to 4–6 hours to maintain freshness before serving.
Freezer: If preparing in advance, wrap tightly in foil or plastic wrap and freeze for up to 3 months. Thaw in the fridge overnight before enjoying.
Reheating: For best results, thaw in the refrigerator and then reheat in a skillet over medium heat for 2–3 minutes until heated through, enhancing the cheesy flavor.
Serving Tips: Enjoy cold or warm—they’re versatile! Just remember to consume within the suggested timeframes to enjoy these delightful wraps at their best.
What to Serve with Cheesy Veg Wraps?
Nothing complements the flavors of these scrumptious wraps quite like a refreshing side dish or drink!
-
Greek Pasta Salad: A zesty, herb-infused salad with feta and olives adds a Mediterranean flair that balances the cheesy goodness.
-
Chips and Salsa: Crisp, salty tortilla chips paired with a vibrant salsa provide a delightful crunch and a punch of flavor for your picnic spread.
-
Fresh Fruit Skewers: Juicy berries and melons offer a sweet contrast to the savory wraps, making for a light and refreshing addition to your meal.
A sweet treat like these fruit skewers will brighten up the table and please both kids and adults alike!
-
Grilled Corn on the Cob: Smoky, buttery corn enhances your gathering’s BBQ essence, adding rustic charm and flavorful bites that everyone will enjoy.
-
Sparkling Lemonade: A crisp, bubbly drink with a hint of citrus keeps the festive atmosphere alive and pairs perfectly with the refreshing wraps.
-
Caprese Salad: The refreshing combination of ripe tomatoes, mozzarella, and basil echoes the fresh veg in your wraps, creating an irresistible duo.
These pairings promise to elevate your picnic or BBQ, making each bite and sip even more delightful!
Make Ahead Options
These Cheesy Veg Wraps are perfect for meal prep enthusiasts! You can prep the ingredients—such as dicing proteins and chopping vegetables—up to 24 hours in advance. Store them in airtight containers in the refrigerator to maintain their freshness. The wraps can be assembled and wrapped tightly in foil or plastic wrap, and refrigerated for up to 6 hours before serving. To prevent sogginess, use lettuce leaves as a barrier between the dressing and the tortilla. When ready to enjoy, simply slice the wraps in half or quarters for easy serving. This prep makes hosting stress-free while ensuring your wraps remain just as delicious as when they were freshly made!

Cheesy Veg Wrap Recipe FAQs
What type of tortillas should I use for Cheesy Veg Wraps?
Flour tortillas work best for Cheesy Veg Wraps due to their soft and pliable texture, but you can also try whole wheat or spinach tortillas for a healthier twist. If you’re seeking a low-carb option, lettuce leaves serve as a great alternative!
How can I store Cheesy Veg Wraps?
Store your wrapped Cheesy Veg Wraps in an airtight container in the fridge for up to 4–6 hours to maintain their freshness. If you’d like to prepare them in advance, wrap them tightly in foil or plastic wrap and freeze them for up to 3 months.
Can I freeze my Cheesy Veg Wraps?
Absolutely! To freeze your Cheesy Veg Wraps, wrap them tightly in foil or plastic wrap. They can be stored in the freezer for up to 3 months. When you’re ready to enjoy them, simply thaw them in the fridge overnight and then you can choose to serve them cold or reheat in a skillet.
What should I do if my wraps are falling apart?
If your Cheesy Veg Wraps are falling apart, you may have overstuffed them. Ensure you’re using just enough filling, keeping it centered, and folding the sides in before tightly rolling from the bottom. Chilling them for a bit before serving can also help keep everything in place!
Are there any dietary considerations I should keep in mind?
Yes! Check for allergies among your guests, especially with common ingredients like dairy, gluten (from the tortillas), and any specific veggies. For vegan options, skip the cheese or use a dairy-free alternative. These wraps can easily adapt to various dietary needs, so feel free to customize!

Cheesy Veg Wraps: Quick, Colorful Delights for Any Meal
Ingredients
Equipment
Method
- Gather all your ingredients for the Cheesy Veg Wrap, dice proteins, and chop mixed veggies.
- Spread the creamy dressing evenly onto each flour tortilla.
- Layer a handful of mixed veggies and cheese on each tortilla, adding any optional proteins.
- Fold in both sides of the tortilla and roll from the bottom up to create the wrap.
- Wrap the assembled wraps tightly in foil or plastic wrap and refrigerate for up to 6 hours.
- Slice the wraps in half or quarters for easy serving and enjoy with garnish.
Leave a Reply